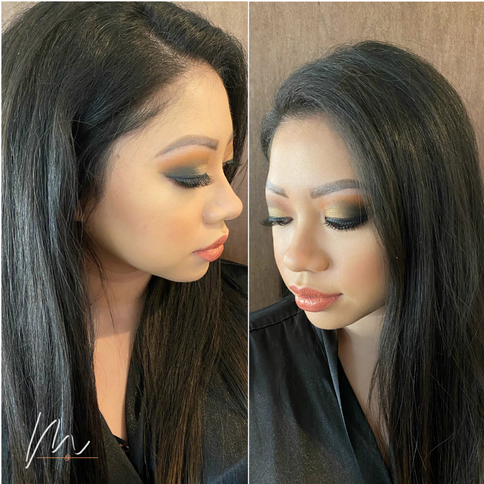
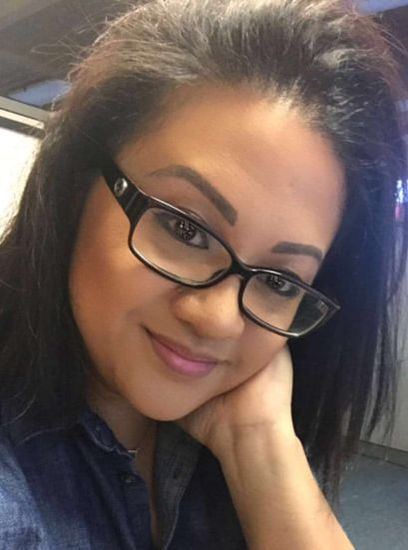
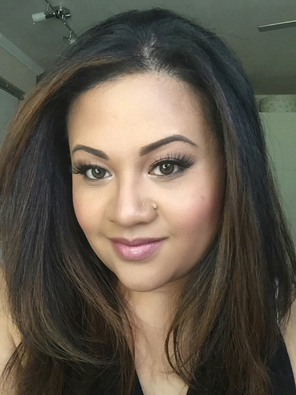
 It's still Winter time, I know! While I'm sitting here working on this entry, it's still snowing and I can hear the blizzard-y winds. I thought I'd get to work on this entry before the power goes out...AGAIN. It's Snowmageddon 2021 and we haven't gotten this much snow in a while. The last time we got snow, we probably didn't get more than 6-8 inches. We're up to a foot and more is yet to come! So, I wanted to bring the summer vibes to us all for just a minute by bringing in my cousin, Jenn, to work a little bit of my makeup magic while I still can (if you didn't know, and you're new here, I am phasing out or "retiring" from makeup artistry in 2022) to focus on other creative outlets. Check out my YOUTUBE!PRODUCTS USEDEverything below is listed in the description box of my video but I'll list it down below for your convenience! FACE
BROWS
EYES
LIPS
 There you have it...me...in action. I just want to put out there that there really are no rules when it comes to steps or application in makeup. However, using colors in ways that aren't meant for the skin, is something else (and an entirely different subject matter) so I'll stop there.
As always, let me know if you have any questions. I know my video is sped up to keep it close to 10 minutes - this is the "sweet spot" for people starting out in YouTube - so let me know if you have a question on technique, products used, etc....I'd love to hear from you! ~ XOXO, Mari
1 Comment
Aside from my intro vid, I just posted a (somewhat) quick makeup tutorial - nothing too fancy...just an easy semi-glam makeup routine when I'm in a rush to getting all done up. These days, I don't normally do the full face because of our masks (they get gunky with makeup if you have too much on) so this was an exception. We were taking family holiday card photos and thought to myself, "what a great way to start a video!" Check out my latest vid on my channel. It's about 20 mins long and I talk through it and do my makeup as quick as possible. Without further ado, check it out here: PRODUCTS USEDYou can get most of these items at Nordstrom and Sephora...the others can be purchased at ULTA). FACE
BROWS
EYES
LIPS
As always, let me know anytime whether you have any questions regarding application or the products I used.
~XOXO, Mari I wanted to take a moment and just say that YOU are BEAUTIFUL. I am at a point in my life where I should be more comfortable in my own skin; however, I still struggle with body image and the fact that I am aging. What society thinks is "beautiful" can put a little pressure on one's self-perception. These days, whether it’s someone you follow on one of the social networks or someone you deeply admire, it's hard NOT to compare yourselves to these people.. 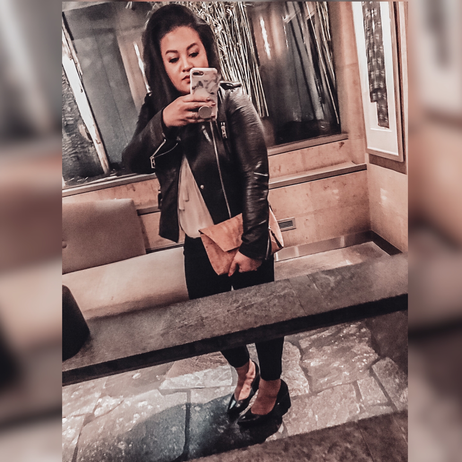 Bathroom selfie because I was feelin’ my outfit Oh those beauty standards...I think what most people don’t realize - whether they’re consciously thinking about it or not - is that, when it comes to the images you see on the internet, magazines, etc. is that they are curated. You don’t necessarily just put any old image out there. There is a process and everything is carefully thought out. One example is when you see someone with an amazing, out-of-this-world physique on Instagram and you think “oh my gosh I want to have her body!” But, in reality, the person you’re seeing is posing uncomfortably - sticking her butt out so that her waist appears smaller and her bottom looks more full and shapely. I’ve done enough photoshoots, where I see the model pose in an unnatural way to exaggerate their features and, many times, it looks amazing in the final photos. 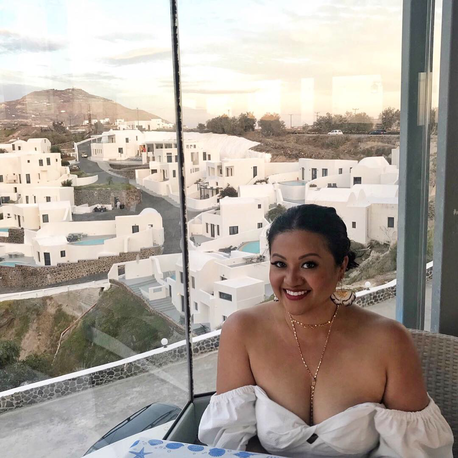 In Santorini...one of the times in my life I felt at my most confident. All the same! People that you admire (and may know personally) might appear so put-together but may be experiencing internal struggles. We ALL have insecurities but many of us don’t necessarily want to put it on blast. We want to appear like we know our shit and are owning it. For example, I have a friend whose style I love - her look, her clothes, her aesthetic in general but she admitted that she struggles with keeping up with the trends and actually doesn’t like her skin and even thinks her arms and thighs are a little on the “big” side. By talking to her, I’d never know otherwise that she’s insecure about things I thought were some of her best assets. Wearing the same top but packing on a few extra lbs....In the photos below, I wanted to try on a top I wore for my 40th birthday trip - just because - to see if I could still fit into it. I admit, it’s a little snug but I don’t look too bad. Now I’m not always the healthiest eater but I am still incorporating workouts. A work-in-progress, I am, but still fly (or as the kids say these days, “snatched”)!!! HAHA Self-perception can be a b*tch!I sometimes come across photos of when I was younger (at a time I always thought I was “fat”) and think “whoa what the hell was I thinking?! I actually looked good!” I remember always comparing myself to others and I know now that was certainly not healthy. Sadly, I still catch myself exhibiting the same behavior! When I do, I shut myself down real quick by silently chastising myself and thinking about my daughter witnessing my self-loathing. Friends and/or family that tell you you’re anything less are not who you should be around and it’s ok to disassociate yourself from them. Most likely, they are hurting and need to find a way to help themselves. Those that hide behind a computer screen and decide to be cruel are also going through some kind of struggle but you have the luxury of the “delete” button. You shouldn’t have to deal with small-minded people. 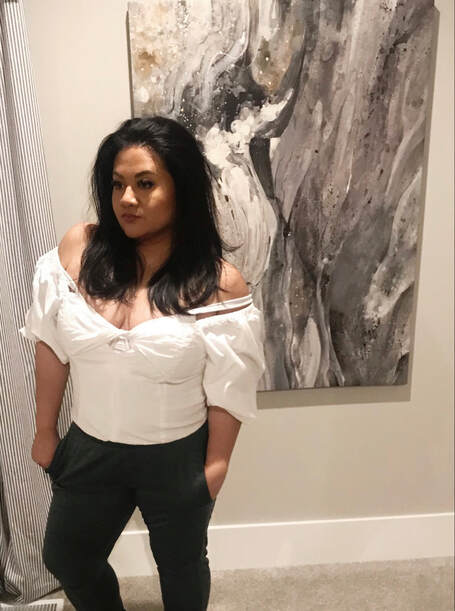 Working my best angles with this top ;D We are Beautiful, in every single wayThe bottom line is, we ALL have insecurities but, if you’re a good person, you wouldn’t go up to someone and tell them they look horrible so why tell yourself that you look that way?!
It’s unlikely you will gain the confidence in a short span of time. It takes experience and a realization to recognize your self-worth and to accept yourself as you are. I am constantly trying to work on self-improvement because I want to be the best I can be by facing my faults and insecurities head-on while handling it all with grace. I hope that we all can one day see the beauty in ourselves as well as the unique qualities we each possess...traits we might see in a good friend. So be good to yourself and to each other. ~ XOXO, Mari It's inevitable...getting old. We all grow older every single year and, although our genetics play a part in how we look as we age, our habits can help play a big part in the process. While some of us have the means for "medical" treatments, there are the lot of us that aren't financially capable. I, for one, am embracing my aging - I think I look better now than when I was in my 20's. There are the celebs that get better with age - JLo, Halle Berry, Kate Winslet, Angela Bassett...(this list goes on) and I aspire to look just as good! 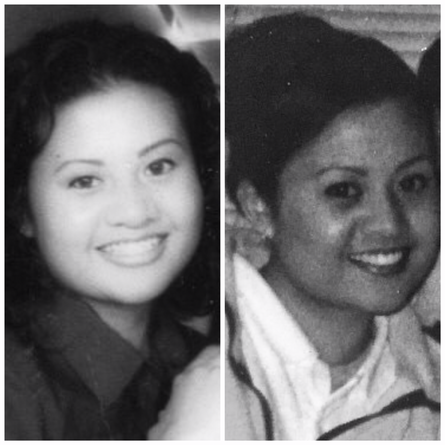 LT: 21 years old | RT: 19 years old I still learn tricks each passing year to help me look and feel my best and it's an on-going process. Almost every time I get to know someone a little better, they're surprised when my age comes up - I still get carded, people think I was a teen mom (still weirds me out), or people assume I'm inexperienced in...well...life in general. Here I am - a 40-year-old woman who has learned the importance of skincare, self-care, and the magic of makeup and I'd like to share what I've learned with you. Let me remind some of you these are just things I've learned that helped me these last 20 years and should be taken with a grain of salt! With this said, I invite you to sit back and read up on my 9 tips of achieving youthful beauty... 1. Skincare 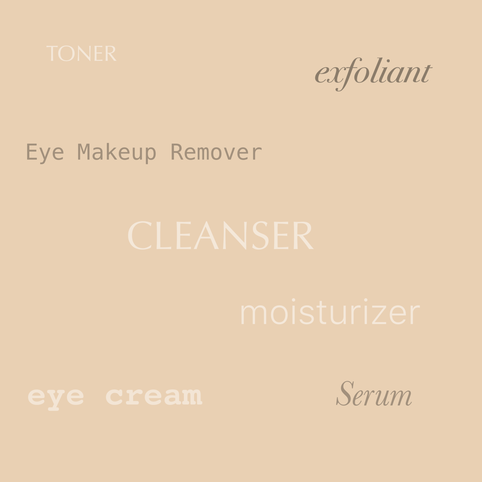 A few items in my skincare routine Having a daily and nightly skincare routine should be well-established for every person and even more so when you're older. My regimen has changed every few years depending on the needs of my skin. Since I'm older, I find myself moisturizing a bit more and using under-eye cream and serum. My number one MUST in my skin care routine is taking every last bit of makeup off no matter what. There are tons of great products out there - whether from the drugstore or department store, so get your sampling on! 2. Sunscreen I think most everyone knows that this is a beauty (and skin-health) must and should be in every person's repertoire, no matter what age and gender you are or what skin tone you have. It's surprising to me that I know some who think that SPF isn't really necessary because they're already dark enough to shield themselves from the sun's rays. Even people that are trying to achieve a tan view SPF as just a hindrance in achieving desired results. Not only can forgoing sunscreen contribute to premature wrinkling, you're also more prone to skin cancer. 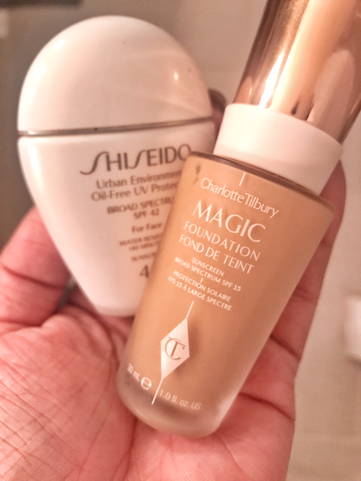 My SPF face products For SPF, make sure you choose one that complements your skin type and where on your body you're applying it to - SPF made specifically for the face may feel different than one made solely for the body. Also, SPF is most often found in our foundation, usually at a lower setting (i.e. SPF 8) but know that this does not add to whatever SPF you're wearing underneath (e.g. SPF 8 foundation + SPF 15 lotion does NOT equal SPF 23). The SPF with the higher number is what you should rely on as your main source of sun protection. 3. Diet & Exercise If you're in the process of developing good habits developed, diet & exercise should make it on your list. It's no secret that, as we age, our metabolism is slower and we aren't quite as limber as we used to be (well, at least for most of us). To sustain a bit of that youthful energy, exercise should at least make it in our schedule 3 times/week. Find something active you love so it doesn't feel daunting. For me, I found my love in Zumba and every time I'm at a (good) session, I imagine that I'm a dancer in some music video. 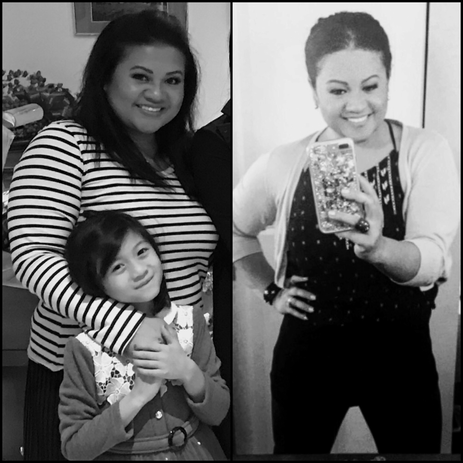 Left (2015): at my biggest | Right (2017): 30 lbs less Of course, exercise is only half the battle. For me, this means being wary of bad carbs, fried food, and sugar. When I'm on a role, I ensure I am consuming less calories than I what I actually burn. This doesn't mean starving yourself - making healthy choices in what you eat every day will make a big difference in the way you look and feel. Also, look to lose 1-2 lbs a week so you're not shocking your body (the faster you lose weight, the faster you add the pounds (and more) back on)! It's the little steps made daily that make a big difference in the long run. 4. Hydrate WATER - the best drink for our bodies. DUH, right?! It couldn't be any more true. When I was younger, I hated water but I really did find it to be the best source of hydration for my body. I noticed that my skin felt smoother and it really did keep me from consuming more than I should. Plus replacing my soda and juices (which are so packed with sugar) with H2O helped me shed a few pounds without having to stress over it! 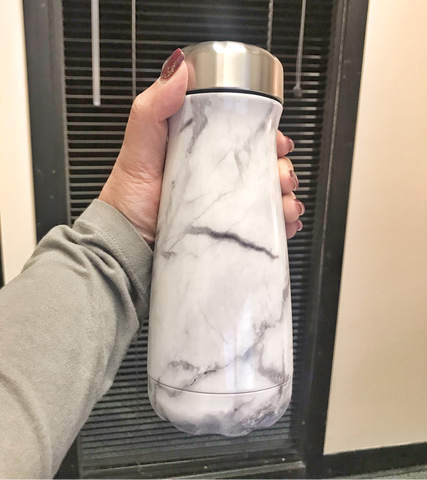 Always carry your water bottle so you have no excuse! 5. Less is More When I say "less is more", I'm referring to makeup. For me, I love wearing makeup - from simple to dramatic! However, I like to dial it down for everyday.  Mature makeup by me - keeping the look light and simple Since wrinkles start to show, the more makeup that's applied to the face, the more that it'll settle in the cracks of the skin. Doesn't sound so attractive nor does it look it. For a more natural look, try a tinted moisturizer. Or if you're partial to more coverage, look for a foundation that's buildable. To highlight eyes, a couple swipes of mascara as well as eye shadow used as liner (or smudged eyeliner) usually does the trick in bringing out your eyes. Cream blush and gloss or lip tint in place of lipstick to finish off your overall look makes for a natural and light finish. 6. Peach/Orange Concealer Years of lack of sleep can really take a toll on our bodies. Our eyes become sunken and are rimmed with a purplish-blue hue. To correct this, a peach-toned concealer under your regular-toned concealer typically does the trick! Not only is this a more natural color than yellow, you won't get overly bright under-eyes when taking a photo. The peach is good for fair to medium tones while orange works really well for darker skin. Yellow concealer is often the go-to for color-correcting but can sometimes look ashy especially on darker skin. Plus peach/orange tones cancel out the blue hue much better. . 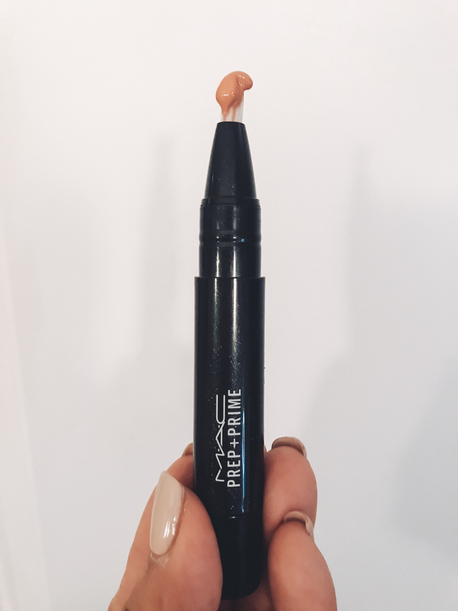 Magic in a tube! To apply, lightly tap the peach/orange concealer under the eyes using your 4th finger (it's the most delicate in pressure) until blended. Then apply a skin-toned concealer on top blending away with a finger or beauty blender using the same dabbing motions. This will get rid of any of the peach/orange color and you're left with a more even and natural finish. 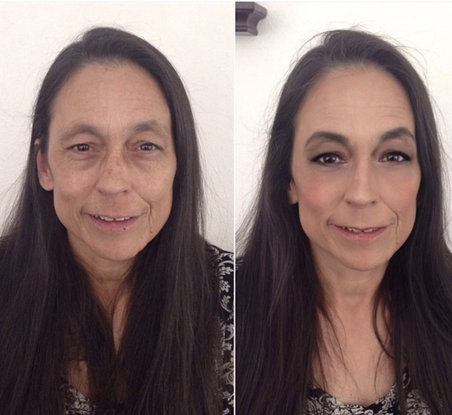 Makeup by me - that peach concealer is my saving grace! 7. Avoid a One-Dimensional, All-Matte FaceThis really can apply to any age. If you look closely at our face, it's not just one color - some areas are darker/lighter than other parts of the face. Depending on the makeup look I want, I like to use a contour shade to define or recede certain areas of my face (cheeks and nose) and/or a bronzer in areas of the face where the sun would normally hit. As a finishing touch, I use a bit of natural cheek color to give me life. 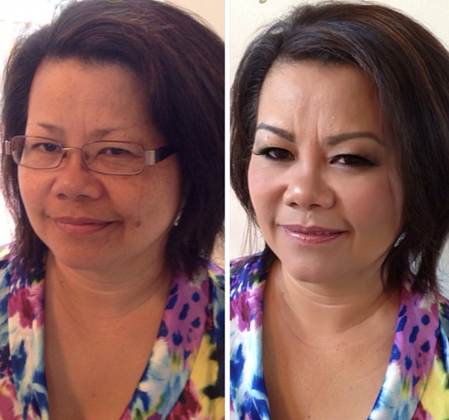 Subtle glossy lips don't scream "teen" Also, a myth that I run into many times for older women is that they only need to use matte colors. I highly disagree! Think about it...as we age, our skin starts to become drier...why would you resort yourself to wearing matte products only to look even more dry? Plus it's such a flat finish that it's not too attractive nor realistic, if you will. Most faces have some kind of sheen to them - whether sweat, or oil. Doesn't sound appealing but it's true. 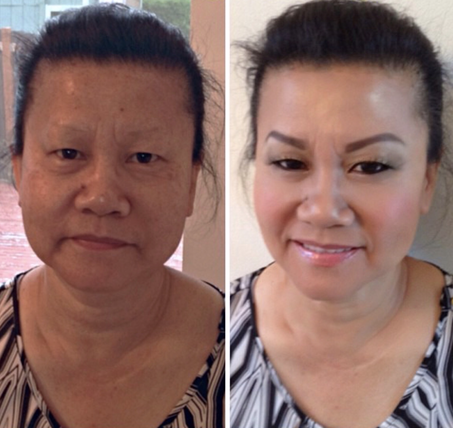 The magic of highlighting cream as a base. As long as your products have a subtle sheen, you are good to go. Anything with heavy flecks of glitter or sparkle is a no-no. To achieve that youthful dew, start with a good moisturizer and primer so that your base makeup goes on more smoothly. Cream facial makeup (blush, contour, highlighter etc.) are great alternatives for those with drier skin types. For people that still have oilier skin (like me), adding a little bit of powder highlighter in areas where light would normally hit further adds to that glow-from-within look. Lip gloss is a better alternative than lipstick because it gives the appearance of more plump lips, which, we seem to lose a bit of as we get older. 8. Thicker Brows
9. Get Regular Trims
 JUST turned that fresh 40! Congratulations if you've made it this far - you've reached the end of this blog!
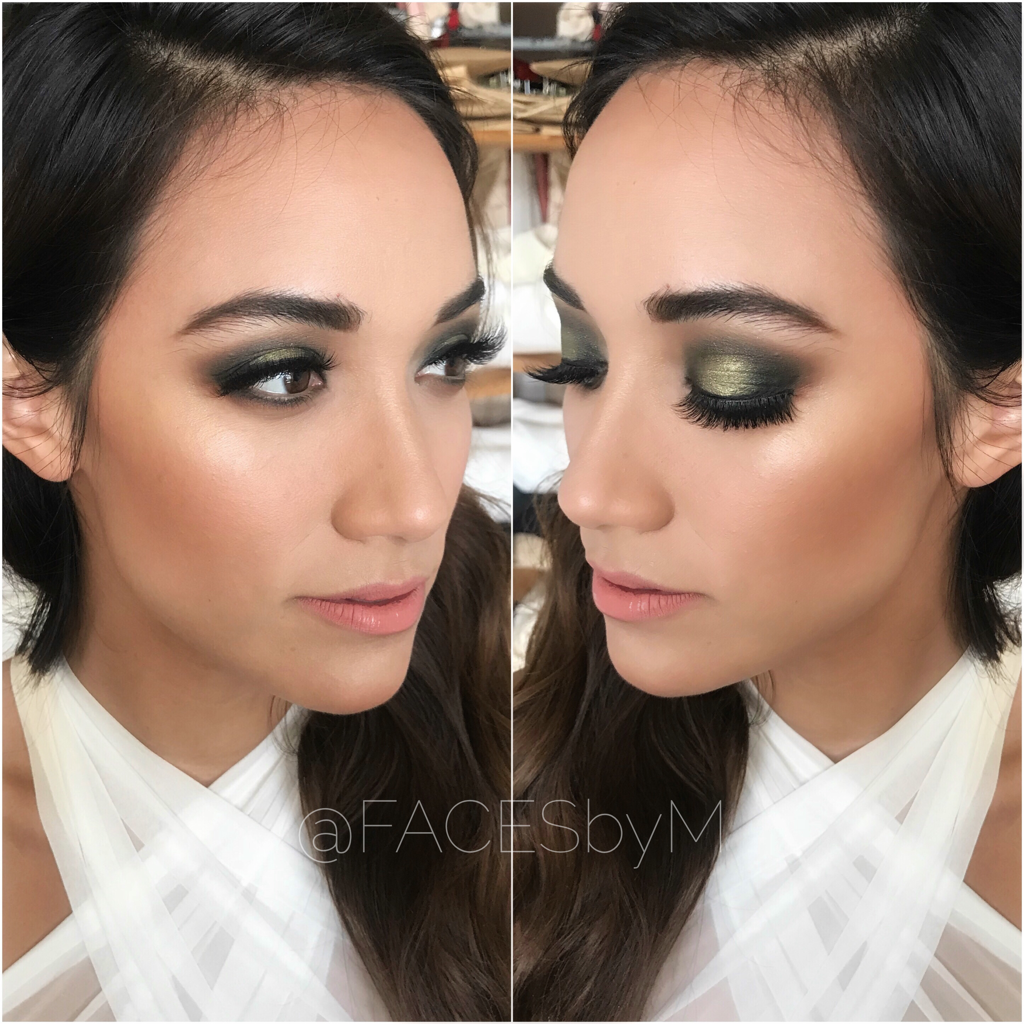
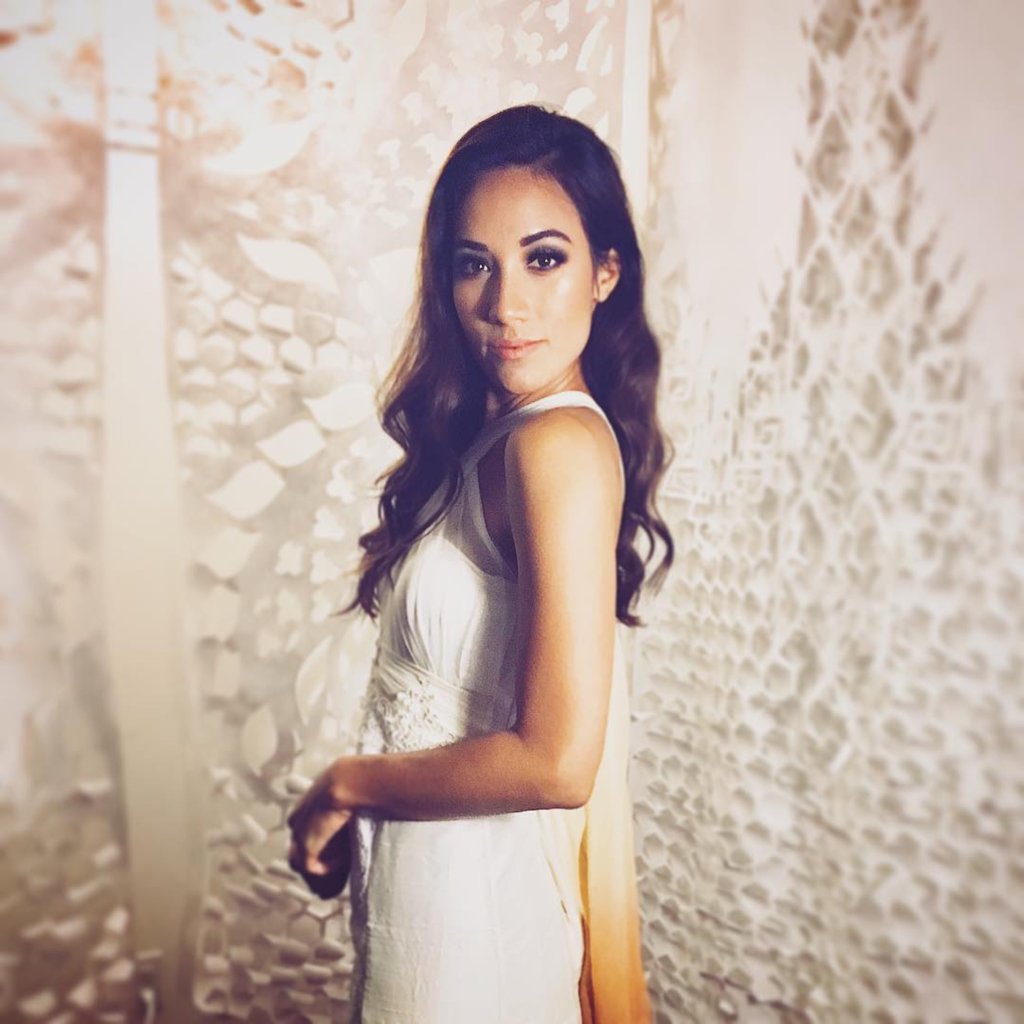
No matter what, you'll always get critics saying it's frivolous to do these things but there's nothing wrong with self-care especially if it helps you feel good about yourself and is beneficial for your well-being. We should all take some time to ourselves to recharge! I hope that, regardless of your age, you were able to pick up some tips to incorporate into your daily routine. You'll thank yourself for starting good habits and being mindful of your health sooner than later. ~XOXO, Mari  Collaboration with fellow artist, Jaime Hansen Every summer, I get busy working weddings and prepping women for various soirées! It’s usually then that I’m working on a whole bridal party either by myself or in collaboration with another artist OR I’m asked for my availability to do makeovers for a special event - anywhere from birthdays and baptisms to car shows and arena events . While it’s flattering to know that people trust my work (or even seem to at the get-go), it’s not always the case when we actually get together. I'm confident when I say I’m pretty good at what I do - not in a cocky sense but that I’ve done this long enough that I'm comfortable getting in someone’s face and working with their features, sometimes changing/revising colors or products as we go further into the makeup application. Transformations can be subtle or dramatic. JUST A FEW OF MY TRANSFORMATIONS...How can you and your artist get the most out of the experience?When I get to talking about potential looks with a client (especially if they don't usually wear makeup), I often hear, "Just do what you want...I trust you." Not only will these uttered words put me under some amount of pressure, it could also make or break a booking and I'll tell you why... What I think looks good on you doesn't necessarily mean you'll like it. I will admit, I still occasionally make this mistake and just "give it a go." Most of the time, I'll get a positive response (luckily) and, other times, I'll get a "WTF" look and I immediately know. I consider myself pretty good at reading people by the expression on their face or by hearing the tone in their voice. When I can sense a bit of anxiety, I‘ll do my best to work with someone in achieving an acceptable look based on their preferences...well, if time permits. I only say this because it depends on whether I have a time limit (i.e. bridal party makeup when I need to get someone in and out my chair at a certain time to start on the next gal). So here is my solution...if you have either worked with me or want to work with me, you'll find that I will ask to see inspiration photos of what you'd like. This, in combination with talking about what you do for makeup on a regular basis, will help me out a TON. A lot of the time, I'll get people requesting a "natural look." This is subjective....what I think is "natural" may not be what my client envisions. This is why trials are important for brides-to-be. Even if it's a regular makeup session...just allotting extra time to make room for makeup revisions will be beneficial for you especially if you're just not sure about a look. Sometimes I'll even go as far as book or offer a 2nd session to show a client I can do better...but I leave it up to them to decide. 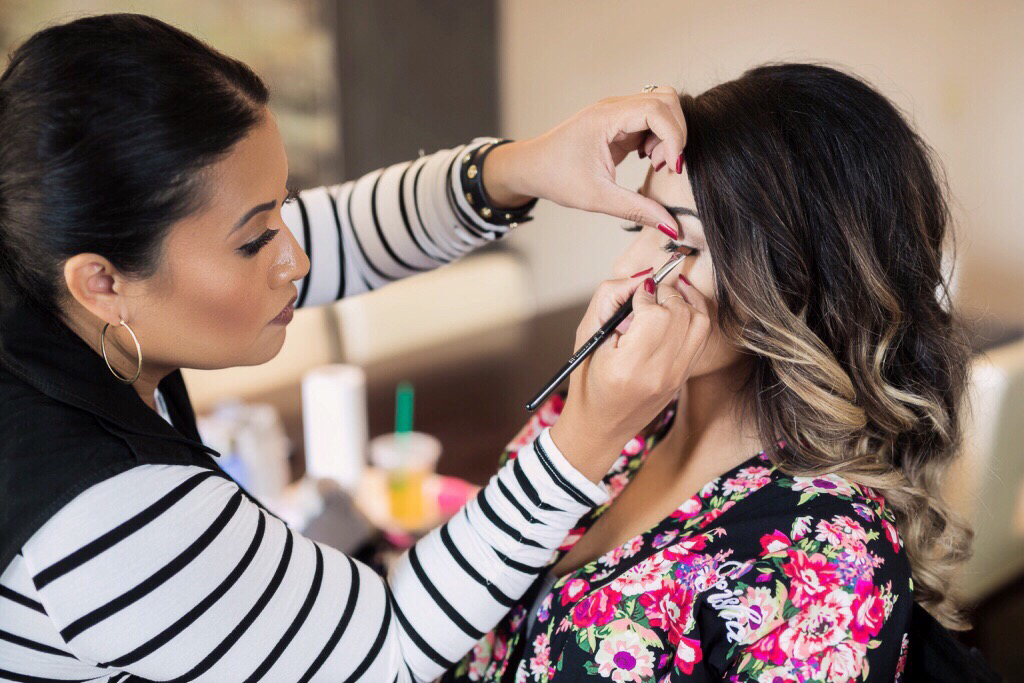 Understanding what your client wants is key to making them happy Ensure that your surroundings are comfortable. Some artists who might read this statement may disagree because we sometimes work in tight spaces and will have to work with what we've got. However, if you want to make the most out of your makeover, make sure that you're comfortable. When I have people come to me, I try and keep the room bright and at a comfortable temperature; I ensure that my client has room to move; I'll offer a drink so they're hydrated; and I'll keep some background music on and try to keep the appointment casual yet professional. When I do travel to my client, however, there should be a space where there's ample room to set up and work from my kit. This space provides your artist with enough room to lay out what is needed and not constantly go in and out of their kit. A medium-sized table by a window or room with lots of natural light is sufficient. In the event this can't be provided, I'd bring a portable light and a makeup chair (similar to a director's chair). Some come with a small table attached to it, which, is even better! Can I transform you into your fave celebrity?I've gotten requests to transform a person into one of the Kardashians, J-Lo, Lily Galichi, etc. There's nothing wrong with that...I can do looks inspired by your fave celeb but I cannot change your features without you looking too cakey. There have been people I've worked on that want to look EXACTLY like these famous folk. It must be understood that people have different features and the more you work against them for the sake of trying to look like Kim or Mariah. the more it won't feel right. I can do these looks to an extent but I'm not a miracle worker. This is work best reserved for a plastic surgeon or when you have hours to sit getting your makeup done by someone who specializes in this type of artistry. Yes, you'll find YouTUBE videos of these artists who transform themselves into different people...but, what most don't realize is, these transformations take an extensive amount of time, and the artists are extremely made over (HELLO 20 lbs of makeup)!! Great for the stage or some photo op, but not necessarily a good look in person. If you have a resemblance to a famous person, great! If not, you will be sorely disappointed. My time is precious and I am, frankly, not the artist you need.
Before you nitpick, WAIT until your artist is finished.I'm sometimes asked by a client if they can have a mirror to see what I'm doing. That's fine but (yes, there is another but) it's not always productive, especially for your artist. Seeing an incomplete face will be jarring to look at especially when you're up close seeing every single pore and what you may see as imperfections. More often times than not, I will be asked to put more product on a specific spot or to change how I do something to mimic what they would do. Think of it this way...when an artist is halfway done with a painting, it will look a little blah and, maybe even look like a hot mess. However, once a piece is finished, it's somehow perfect. All the colors and textures that needed to be added have made their way into the final phase and completes the overall look. Same applies to makeup. For example, seeing bold brows with no mascara or eye shadow can look scary. Also, keep in mind that when you put a mirror inches from your face, anything on your face will seem more emphasized. Most people will not be thatclose to you and, honestly, won't notice what you're seeing. Heck, if your significant other comes in for a kiss, chances are they won't be looking at your pores either! Wait until your artist is finished before you make an assessment. Making your artist "correct" at every phase will not only add unnecessary time to your appointment, but will make you BOTH uneasy and doubtful. 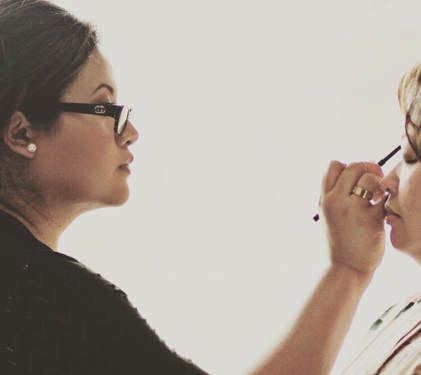 Makeover time! Not only is it good to communicate with your artists, it's okay to voice your concerns. Don't worry, we won't be offended (as long as you're polite) and we understand that you each have your preferences. If you're afraid to say anything, you'll only regret it. So, yes, please...SAY SOMETHING! : )
With everything that’s been said, an inspiration photo is key along with an explanation of your regular makeup routine as it’ll help you and your artist both narrow colors and styles down! I was inspired to write this piece because of a few unlucky experiences I've had recently as well as over the years (yes, I have them too!) and I wanted to shed a little light on what goes or what might be said during appointments. If you’re working with a good artist and they genuinely try their best to make their clients happy, then it’s a good sign! When makeup applications turn out kind of “meh" or even "blech"... good artists will try to pinpoint what needs improvement, move forward, and strive to do better the next time around. ~XOXO Mari Hi. I’m Mari...and I’m a beauty junkie. Often times, I go into a store with a list in my hand of necessities I need and walk out with a crap load of extra items that I thought either looked cool or was something I saw in an ad that popped up on one of my social medias. Damn you marketing gods!! There have been times I’ve been lucky when purchasing a new item but, occasionally, I'll find that I've somehow wasted my money. Now, I know the title of this entry sounds a bit on the negative side but it's my honest review of some of the most hyped up beauty products out there. I intend for this entry to be informative and, who knows, could (potentially) save others from disappointment. Don't get me wrong...others may absolutely love these products (I can see a couple items in this article to be considered holy grail products), but, sadly, they didn’t quite work out for me. Sharing my experiences may help y’all think of alternative ways to make them work for you should you try any of these items out yourself. Too Faced Peach Mist Setting Spray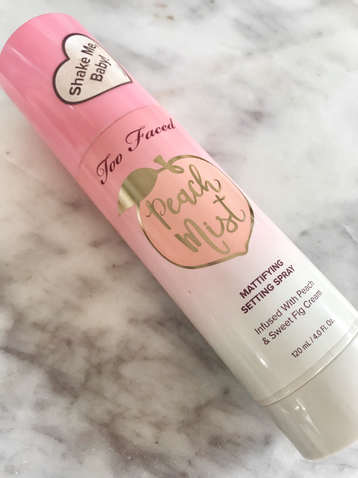 This fruit-scented mattifying setting spray is part of Too Faced's Peaches & Cream Collection. When you take a whiff, it smells a whole lot like Peach Marshmallow candy. This 14-16 hour long-wearing spray is described as "silky" and meant to control oily skin (ME) and leave a dewy glow. I'll be honest, it does a great job of controlling the shine and I feel it's best reserved for those with oily skin types. POSITIVES: Gluten-Free; Paraben-Free; Sulfate-Free; Phthalate-Free; Oil Control; Fruit-scented (that may appeal more to the younger demographic)  One day, without thinking, I failed to shake the bottle before application. I did a good misting on my face and did a final check in the mirror then went on my merry way to run some errands (the product still hasn't settled, mind you). About an hour or so in, I checked my eye makeup in the mirror and, to my horror, saw white specks on my face (like I had dried drool droplets all over) and what appeared to be flakes in my hair - as if to add to my existing dry scalp issue (more on that in another entry)! And, also, why the HECK did anyone NOT tell me?! Needless to say I was a bit red in the face...I sprayed some on my arm (see picture to the right) to show you what I mean. This is a hard lesson learned to always follow directions of use! Now, technically, it is my fault because there's a big sticker on the cap that exclaims "Shake Me Baby!"...then it dawned on me that the white specks may be a type of water-soluble powder ingredient to help with oil control. Also, while it claims to leave you with a dewy finish, I didn't experience that glow factor. In fact, it did an all-too good job of mattifying my face that I felt it almost emphasized my minor wrinkles. I like to be matte but with a little sheen. There's nothing too aging than truly matte makeup, especially when you're over the age of 35. Lastly, while the scent is pleasant for most, it smells a little too "young" for me. It doesn't smell bad and I know I'd love it if I were 12 - 17 years old but I tend to be more biased to light floral scents these days.. Something "age appropriate" if you will. Final Verdict: It's an okay product and must be used with care especially before spritzing. I'll be using my bottle until I run out because I hate to waste product and, unfortunately, I am not going to repurchase. Retail Price: $32 Ardell Magnetic Full-Strip Lashes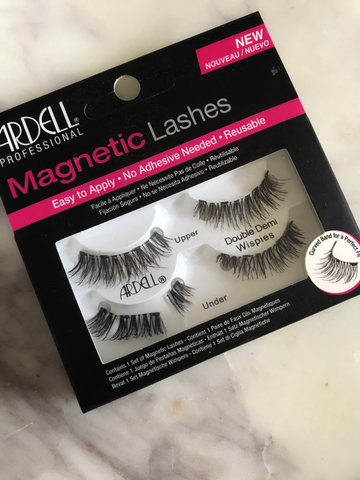 This product is a major fail. Magnetic half lashes made their debut about a couple years ago and I've heard mixed reviews. So, when I saw these at the Walgreens in Vegas, I wanted to grab a box to try because I've never seen nor heard about magnetic FULL strips. The box comes with 2 pairs of lashes, each with 4 teeny-tiny magnets on the lash line. One pair lays on top of your actual lashes while the other pair goes underneath your actual lashes, hoping to connect with the falsies on top. CAVEAT: You've got to make sure the upper falsies are secure for the bottom falsies to align exactly. It took me about 10 minutes to attempt but had no real luck. The outer corners seem to attach a lot better than the inner corners. The inner corners weren't close to the lash line at all and just appeared to be falling off your eye. My 2nd attempt, I tried another approach. I cut the bottom lashes in 3 sections to see if that would be easier in connecting with the upper (full) strip. It definitely was easier but the inner corners still looked loose and still wasn't nearly as close to the lash line. Final Verdict: Provides 2 pairs of lashes so you could potentially wear them separately (but with lash glue, of course). Don't waste your money on this item (or at least from this particular brand as I can't speak for others). However, I can see the magnetic accents (half) lashes working... If you have any tips for getting these to adhere perfectly, let me know, because I'm curious to find out how! Retail Price: $12-14 depending on style and store Tarte Maracuja Oil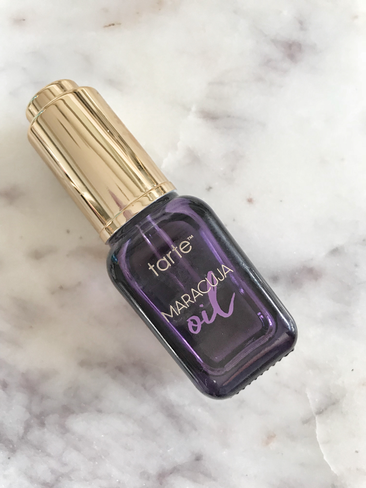 The marketing on this product is "a vegan face oil for a healthy, radiant complexion with no greasy feel." Honestly, I went back and forth with this product. I saw it everywhere on social media and wanted to try it out. I wanted to LOVE IT. Naturally I have an oily skin type but now that I'm getting older, I noticed that some areas of my face were a bit drier than normal. And with our Pacific Northwest weather, we tend to have really cold days, which, can exacerbate the skin. Ironically, the oil itself doesn't feel greasy after applying (if you use a 1-2 drops (3 at the max)) but the unscented oil has an uncanny smell to that of oil used to cook egg rolls. I love eating egg rolls but I don't like smelling like the oil it's been fried in. Although this product is made for the face, it's a bit heavy for my skin type (even with the dry patches I seemed to have) but I do use it on my hands, neck, and arms because anything below my neck is pretty dry. My skin soaked the product right up and I was left with softer skin. It's just too bad the smell makes me gag! Again, I will use this product until I run out so as not to waste it. Until then, I'll just have to bear it (luckily, I bought the travel size so I'll run out of this stuff fairly quickly). Final Verdict: It's mostly a good product but is not recommended for anyone with oilier skin types. If you don't mind the natural, unscented liquids, then try this product out. Otherwise, I wouldn't bother. There are other oils you can probably find with a more pleasant smell. I really tried to love this product but the scent (or lack thereof) is a deal-breaker for me. Retail Price: $16 (travel size), $48 (1.7 oz regular), $68 (super size) Fenty Beauty Pro Filtr Foundation 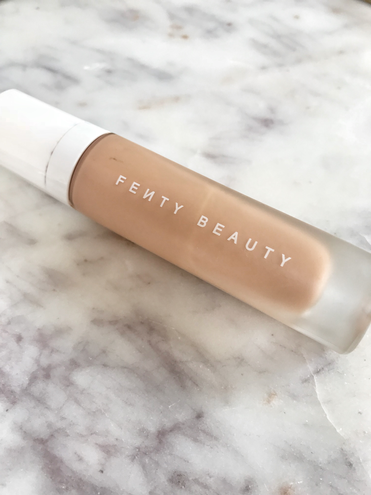 I know the young 'uns will probably disagree with me (and that's okay) but this is another product I wanted to love. If you've been living under a rock, this line was created by none other than pop singer, Rihanna. This foundation is said to be "the ultimate photo filter in foundation form." It is medium coverage, however, i experienced a more full-coverage application - and this is using about a dime-sized drop! You also have to work fast because the liquid dries down rather quickly. This foundation is long-wearing and does a great job in keeping my oily skin under control; however, my skin tends to look super dry (even with moisturizer and primer) and the color will oxidize. The Sephora Consultant talked me into getting a peachy shade and I ended up looking a bit orange. The shade I think I was closer to was on backorder. Again, I'm trying to work with it by thinning it out and mixing in a lighter-toned foundation but, frankly, that just takes too long...ain’t nobody got time for that! POSITIVES: Available in a whopping 40 shades; Made for all skin types; Paraben-free Phthalate-free; Long-wearing Final Verdict: When you're older like me (35 and over), I don't think this foundation is quite for you. I've heard rather rave reviews from younger women, mainly, and that's wonderful! The foundation actually looks great on them! But, for me, it just didn't work as I'd hoped. It felt thick and drier than normal, and the finish seemed more matte than I'd liked. The foundation ended up settling into my creases so I had to really work in buffing these areas out. This brand does have a foundation primer available so perhaps you have to purchase it to make this base work (but I've already got 2 personal primers and there was no point to purchase more). Retail Price: $34 Zoe Ayla Silicone Beauty Sponge Applicators, 2-pk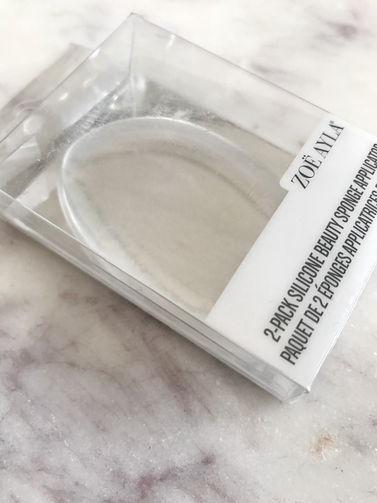 This isn't the only brand that sells these silicone "sponge" applicators. I actually snagged mine (above) from one of Hautelook's flash sales and bought the 2-pk at a deep discount. The idea of this applicator is to provide an airbrushed finish by only using half the amount of makeup you'd normally use because it's not absorbing the product. I thought, "Wow cool...this may be something I could use on my clients!" Of course, before making a commitment to buying a few applicators, I tried it on myself. I am most often my own guinea pig and I found it didn't give me the airbrushed look it claimed it could give. I could see streaks and some blotching. If someone has a technique in applying with this tool, please let me know. I hate to think that these are a waste of money because it seems like a genius concept. POSITIVES: 100% bacteria-free and easy to clean; Non-irritating and allergy-tested Final Verdict: In theory, this concept is innovative and meant to make our lives easier but, in fact, it takes a bit of work to ensure the foundation (or any cream product) is blended to perfection. I've tried multiple times to work with it but, truthfully, it just gets a little discouraging each time especially when I can't seem to work with it the way I want. Since it doesn't absorb any of the excess, the foundation seems to "sit" on top of the skin. Therefore, I end up buffing the rest with my dome-shaped brush or beauty blender. Still, feel free and try this out because there have been people out there that actually like its application. I, for one, am definitely not getting on that bandwagon. Retail Price: $30 So, there you go...my honest opinions on some products that I'm sure you've seen, used, or been intrigued by.
Let me know if you have any questions with the products above or have experience in using them and what your thoughts are. :-) ~ XOXO, Mari Make sure to tune in to my last entry of "BEST 5 FOUNDATIONS" posted just before this article, Ahh concealer! For most of us, this goes hand in hand with foundation, BB Creams, CC creams, whatever your base is. When I look for my must-haves in a concealer, I want to make sure that 1) it's full coverage 2) it's not a drying formula, and 3) it helps to correct whatever blemish or discoloration I have going on at the moment. For most concealers I use, blending with a damp beauty blender by blotting out is the best way to achieve that air-brushed finish. The products I'm about to share are my tried-and-true formulas. You will find that these are department store brands because I honestly have not found drugstore formulas I'm happy with (not to say I wouldn't, one day). Again, all opinions are my own so it's best that you try them out for yourself to see if you like them. In no particular order, I present to you the following: 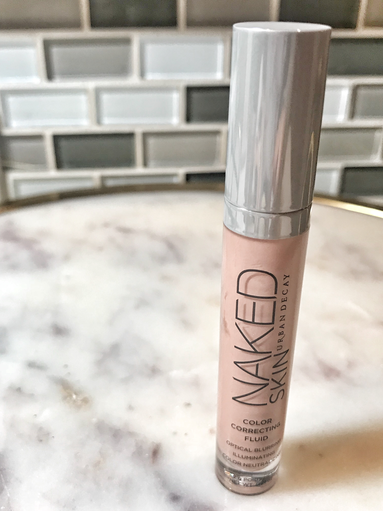 #1: NAKED Skin Weightless Complete Coverage Concealers by Urban Decay 14 shades, 0.16 oz/5 ml, retails at $29 PRO: This lightweight, fluid formula easily glides on and the coverage is awesome. It's a demi-matte finish so I don't find it drying nor does it settle in my creases. Coverage is build-able, though, I wouldn't pack it on too much as it starts to look overkill. Comes with a doe-foot applicator. Gives off a nice, natural finish which I like on days that I want a minimal look. CON: This isn't as long-lasting as the other concealers mentioned in this blog possibly because I have oilier skin (even with setting powder). People with drier skin types that I've used this on, however, seem to have no qualms on wear. NOTE (re the photo): I only have the correcting fluid concealers left as I just ran out of my shade a few weeks ago. Packaging, however, is similar. 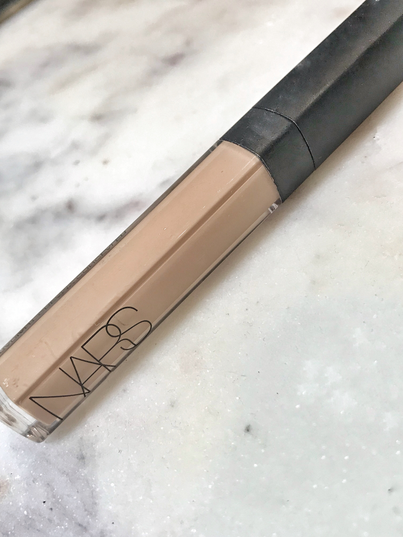 #2: NARS Radiant Creamy Concealer 22 shades, 0.22 oz/6 ml, retails at $30 PRO: A whopping 22 shades, one can easily find their color. A favorite among many, its creamy texture does it all - covers, corrects, and highlights. Instantly lifts areas where it's applied. A little goes a long way. The formula is hydrating and smooths instantly and appears to blur fine lines. Again, this is a doe-foot applicator but blending out with a beauty blender is key. CON: There's a bit more product than the Urban Decay concealer but I feel as though the cream is hard to get when it starts to run out. I've noticed the "stopper" at the opening may have something to do with the inability to get the last of it. To fix this, I remove the "stopper" at the neck - it's an extra plastic piece - to be able to get every last bit. Take note that this gets a little messy so be careful. 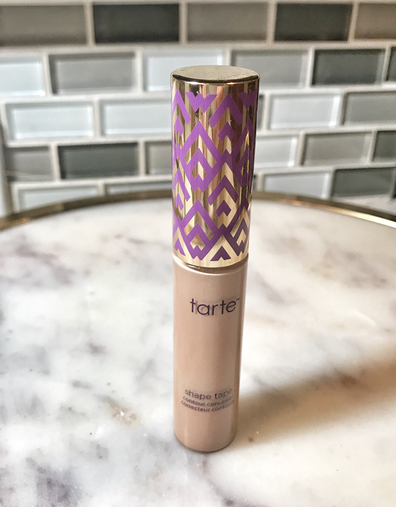 #3: TARTE Shape Tape Contour Concealer 14 shades, 0.33 oz, retails at $27 PRO: This is my absolute favorite at the moment and I'm on my 3rd tube. It comes with a thicker, doe foot applicator (as opposed to the first two on this list), which, makes application easy. Product is creamy and I feel like this lasts quite a while as you don't need much product. This concealer smooths, highlights, and corrects problem areas and I've found it to be long-lasting - it still looks perfect 4-5 hours in. Aside from its performance, it has a pleasant, mild floral or laundry fragrance...I can't quite tell but it smells good. CON: If you apply too much around the inner corner of the eye (or anywhere there are wrinkles), it tends to crease (at least for me) so apply in those areas sparingly. 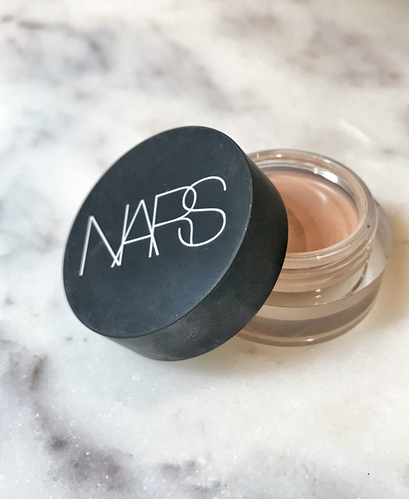 #4: NARS Soft Matte Complete Concealer 16 shades, 0.21 oz/6.21 ml, retails at $30 PRO: For any larger blemishes, this is what I use to cover and conceal. Sometimes I'll use one of the darker shades to contour the perimeter of my face or I even use one in my skin tone to get crisp lines when I wear red lips or when I do my brows (especially when I have a few strays that I'm too lazy to pluck). This is a full-coverage concealer and goes on smoothly and is easily blend-able. CON: Like all creamy cosmetics packaged in a pot, it dries out faster than, say, a liquid version. You'll know this because the edges start to separate from the edge of the container.  #5: MAC Pro Longwear Concealer 16 shades, 0.30 oz/9 ml, retails at $23 PRO: I use this on all my makeup clients and it's one of the best as it's long-wearing and brightening This has lasted me more than 10 hours and works overtime whether you're dancing, at a rave, or at your wedding. The formula is light and, again, a little goes a long way (1/2 to 1 pump will do). Best applied with a small synthetic brush or a clean finger and blended out with a damp beauty blender. MAC also has a recycling program called "Back to MAC" where you take your empties in (for every 6 empty containers, you get 1 free lipstick, lipglass, or potted eye shadow) - very cool. CON: Comes with a pump to dispense the liquid, so, once the product starts to run out, it's difficult to get the last remnants. You can't untwist the pump either. Naturally, it was hard to narrow my favorites down to 5 and I'm sure there are other great concealers out there waiting for me to try. ;-) Give one of these a shot and I hope they work for you as it did for me.
Again, if you haven't already, make sure you check out my blog on my 5 BEST Foundations - I'll link it here for your convenience...best-5-foundations.html Happy reading! ~ XOXO, Mari I'm frequently asked for my opinion on what I think are the best foundations or concealers out there. I've tried quite a bit since I've been allowed to wear makeup (hehe)! Over the years, formulations have become more sophisticated and now caters to many more different skin tones. Now, granted there are a few more amazing-sounding foundation currently in the market that I'd like to try but a gal can only use so much of it! But these are the best I’ve used, so far. This post has been on my mind since late last year and I feel I am ready to write about what I've used that's worked best on me. I've also included a "Holy Grail" product that I not only use on myself, but my makeup clients as well. As hard as it was, I've narrowed my options down to my BEST 5 foundations due to the fact I've bought them multiple times when I'd run out. Tools of Choice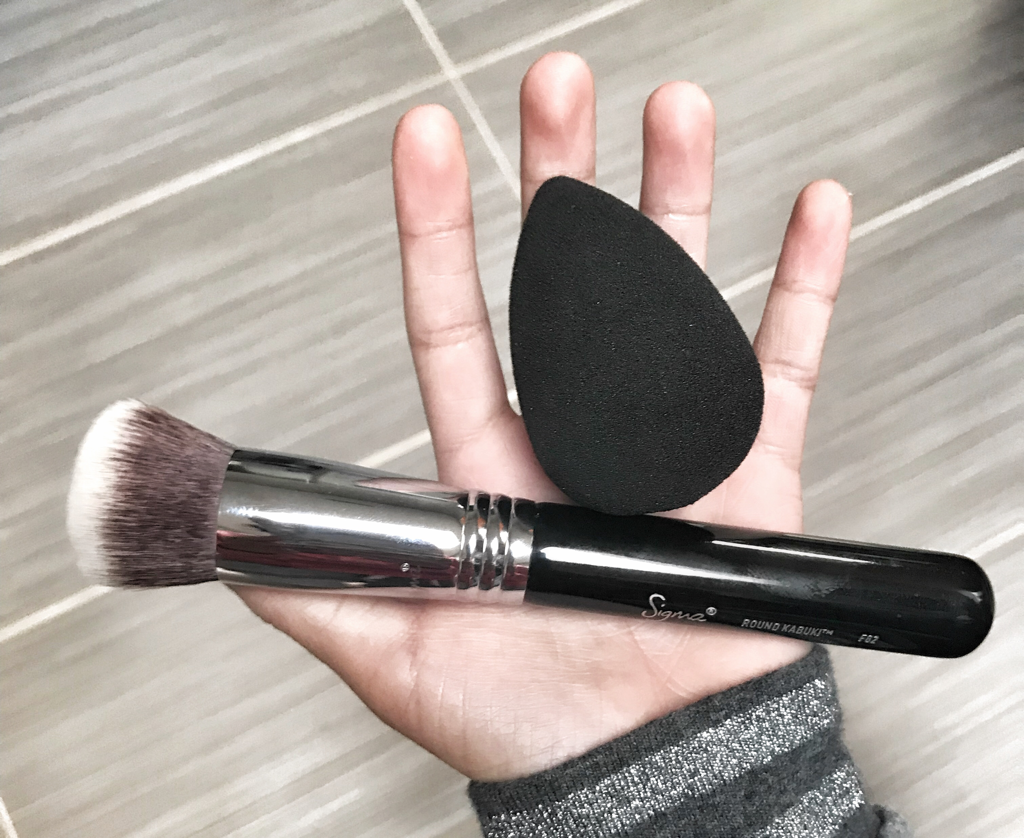 Domed Foundation brush, Beauty Blender, clean fingers! I am a bit fickle with foundation...some days I want to look more natural (ala the 5-minute face) and other days I want to go "full coverage" for a glam makeup look. I apply with any of these 3 tools: my fingers, domed synthetic foundation brush, or a beauty blender (or something similar to it) depending on what type of coverage I want. Read on for my best 5 foundations (in no particular order): #1: Maybelline FIT ME Foundation Matte & Poreless Normal to Oily, 1 oz/30 ml, retails at $5.50 - $8.00 PRO: This drugstore find is the best I've tried as far as performance compared to others in its category. When applied, it minimizes pores and works to control shine. There are 40 shades to choose from so most won't find it an issue to find their match. For a quick application, I use about half a dime-size and apply by patting throughout my face then smoothing with my fingertips. Coverage is build-able and its ability to even out skin is truly impressive for its price point. CON: This formula doesn't last as long - possibly because it's a drugstore brand, so, use a bit of loose powder to extend its wear. This also doesn't have SPF so make sure to apply some before using this foundation. 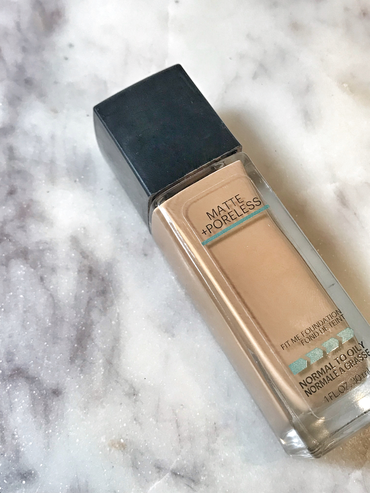 #2: M.A.C. Pro Longwear Foundation All skin types (but best for Oily), 1 oz/30 ml, retails at $35 PRO: Marketed to wear 15 hours long, I believe it! About 6 hours of wearing it, I appear to have a dewy glow as opposed to looking like an oil slick! This foundation is medium - full coverage and has lasted me through many hot summer days as well as special events (i.e. wedding, concert, dancing, etc.) A little over 20 shades to choose from, there's bound to be a match for most people. You only need about a dime-sized (or less) drop for your face and application is best with a dome brush or beauty blender. This formula lends an airbrushed look by minimizing pores and evening out your complexion. CON: Like the Maybelline Fit, this also doesn't contain SPF so be sure to wear a face-friendly sunscreen underneath this base. Be cautious of applying too much...since it's thicker in consistency, you run the risk of looking "cakey" and, although it's marketed for all skin types, it may be a little drying for those with dryer skin so use a good moisturizer. 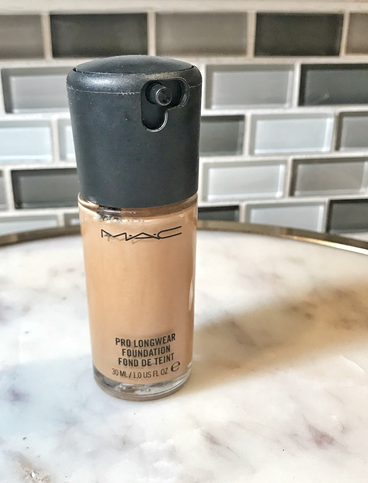 #3: NARS All Day Luminous Weightless Foundation All skin types, 1 oz/30 ml, retails at $49 PRO: Available in 20 shades this, too, is marketed as a long-wearing foundation (approximately 16 hours). A little goes a long way...and I mean a LOOONG way. I don't use much of the product but the coverage is amazing and your skin immediately looks flawless. I find this product applies well with all the tools I have - beauty blender, dome brush, and my fingers. I will say, though, that I might use just a little more foundation when applying with a beauty blender. I feel it absorbs the product a bit more since the liquid is thinner in viscosity. CON: On the more watery side so watch when you pump it onto your hand. Also, if you apply too much on your face (more than a dime-sized drop), then it tends to "slide" around. If this happens, set with a good powder and spray.  #4: Bobbi Brown Stick Foundation All skin types, 0.31 oz/9 g, retails at $46 PRO: Easy to travel with or bring along for touch-ups, this foundation provides that natural finish I strive to achieve. I use this on days where I want a clean, no-fuss application and the appearance of perfect skin that's not too "done." There are other high end stick foundations out there that have full coverage but later appears to melt off my face. This particular formula (marketed to give you medium to full coverage) has not broken down or separated on my skin after a few hours in. It stays put. I apply several "stripes", focusing more on the center of my face and blend by blotting outwards with a damp beauty blender. The range of colors aren't bad (30 shades available) so, again, this caters to many skin tones. CON: I feel like I'd run out of product faster because it's a stick and it appears I have to apply more to get the desired coverage I need whereas a liquid would essentially require me one pump. Also, I sometimes get dry patches on my face depending on the weather and my dry areas seem to get a little exacerbated with this foundation on. And, again, this does not contain SPF. 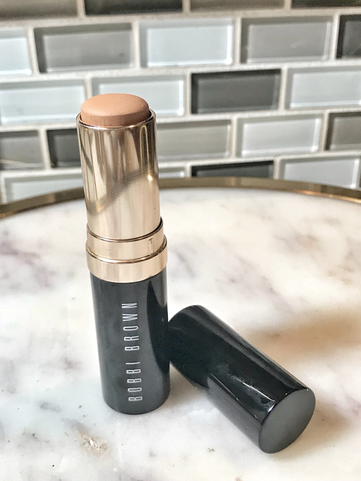 #5: Makeup Forever Ultra HD Foundation Made for Normal to Combination but great for ALL skin types, 1 oz/30 ml, retails at $43 PRO: Available in 40 shades, this was specifically made for the film and TV industries (hence the HD tagline). It provides a natural to medium coverage and, I feel, it's best applied with a dome brush. You may be able to achieve fuller coverage by applying just a little bit more. This foundation has been one of my "holy grail" products for brides and special event clients as it photographs and shows up on screen beautifully. Most clients I use this on love that it doesn't feel heavy on the skin yet gives them an even skin tone. And, although it's not marketed as a long-wearing foundation, it stays on for hours when applying a long-wearing concealer over areas that need correction and then set with powder OR misting setting spray over the face. CON: Once again, no SPF. Also, I use a little more product (3-4 pumps) when I want full coverage, which, means I waste product faster. 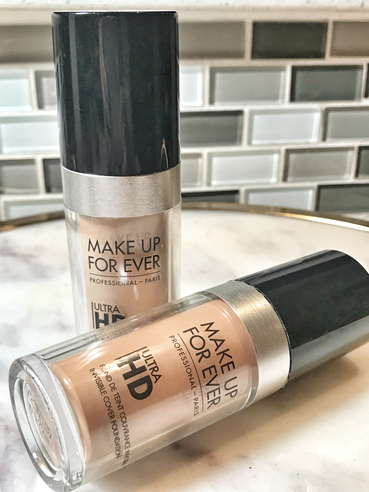 All these foundations I have been impressed with as far as performance and coverage. You'll notice that these all don't have SPF and that's probably a good thing. I've found that foundation with SPF tend to have "flashback" when you're taking a photo. This term refers to that white, ghostly face you see and, although, it looks great in reality, it's obvious in the photo that your face doesn't match your neck - YIKES! I am not being sponsored by any of these brands and are of my honest opinion. When I get a chance to try other amazing undiscovered brands out there, believe me, I'll let you know! I have a separate entry on concealers so stay tuned for my 5 Best in that category (coming to you in a few hours as a follow up to this article). I could've included it here but it would just get waaay too lengthy. Anyway, CHEERS, and see ya on my next post! ~ XOXO, Mari
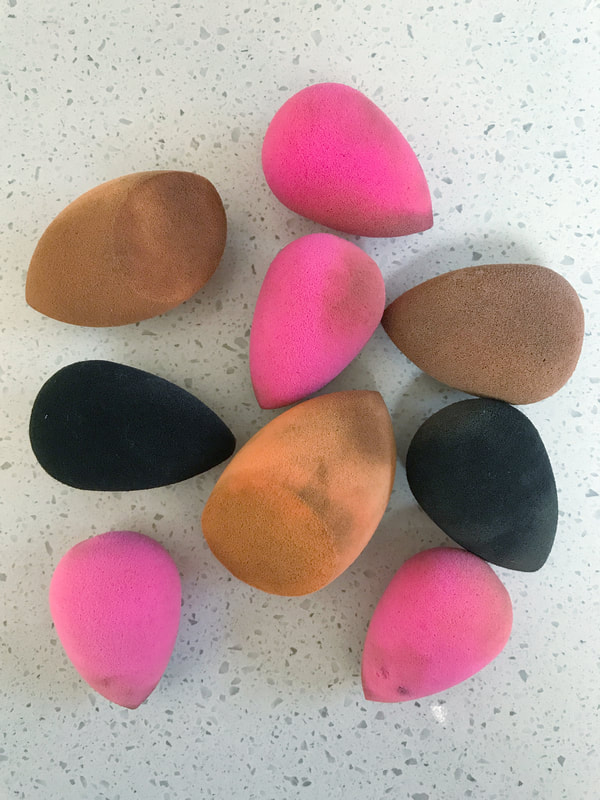
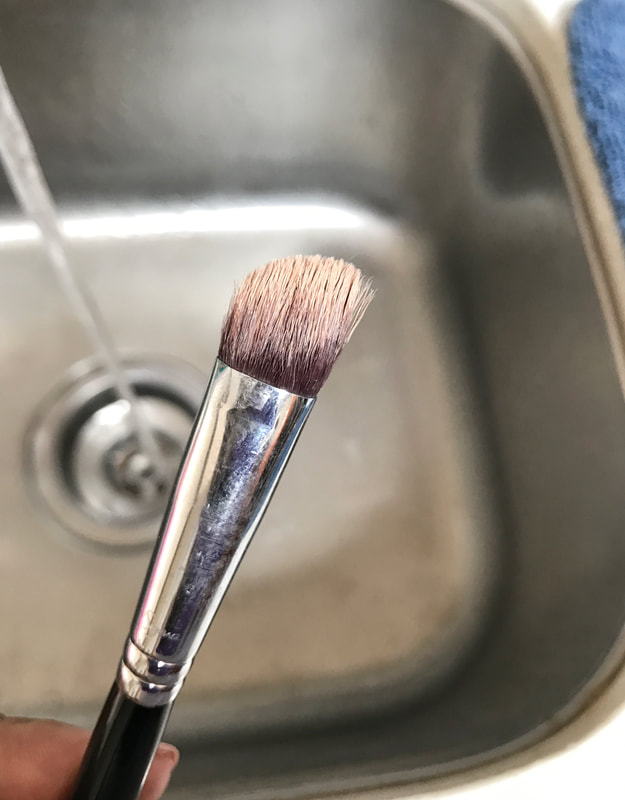
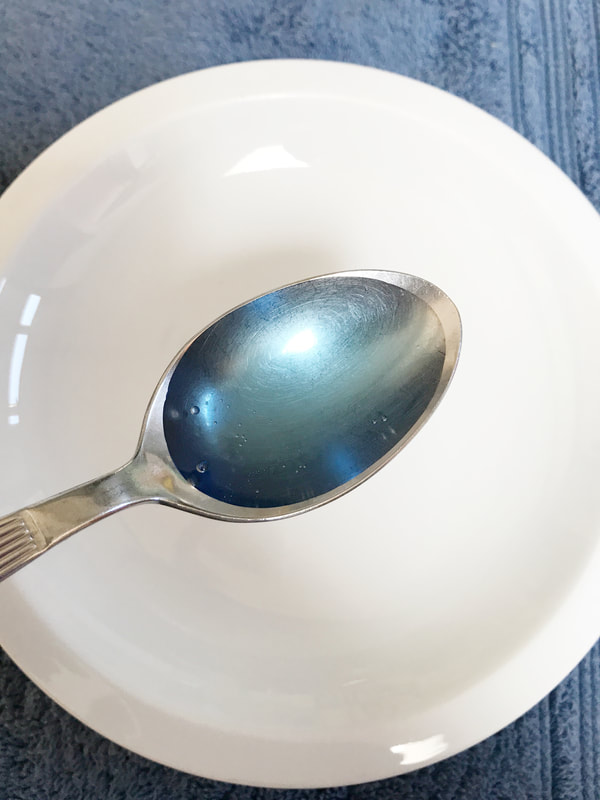
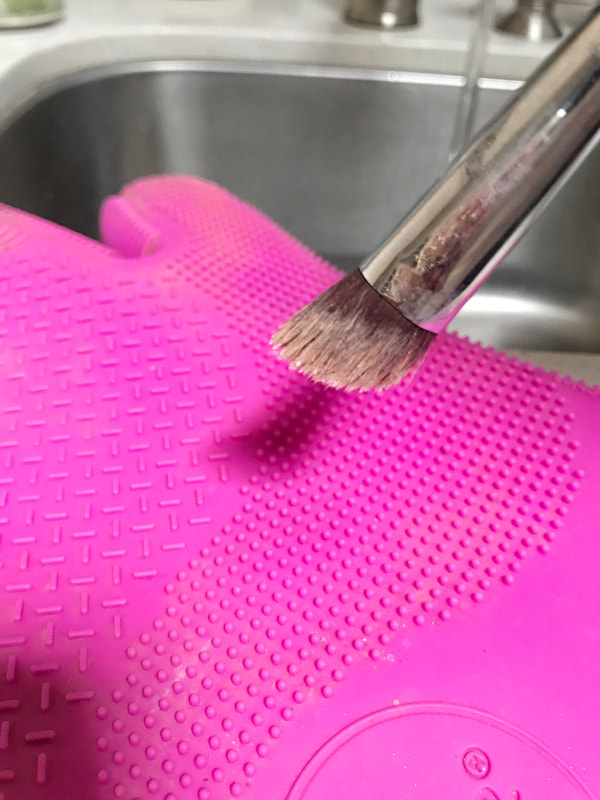
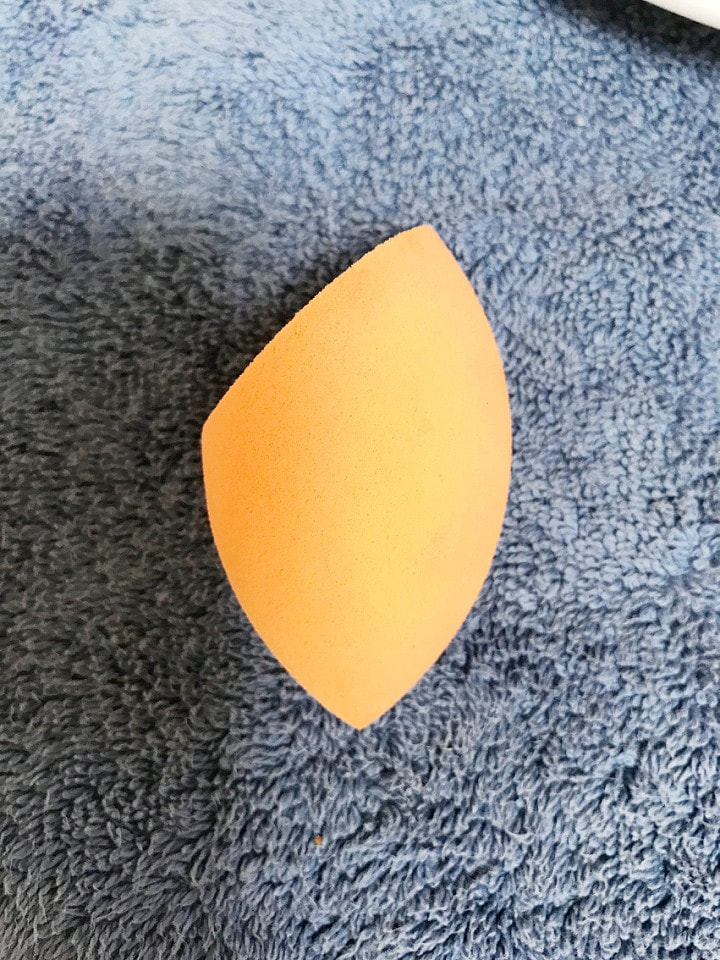
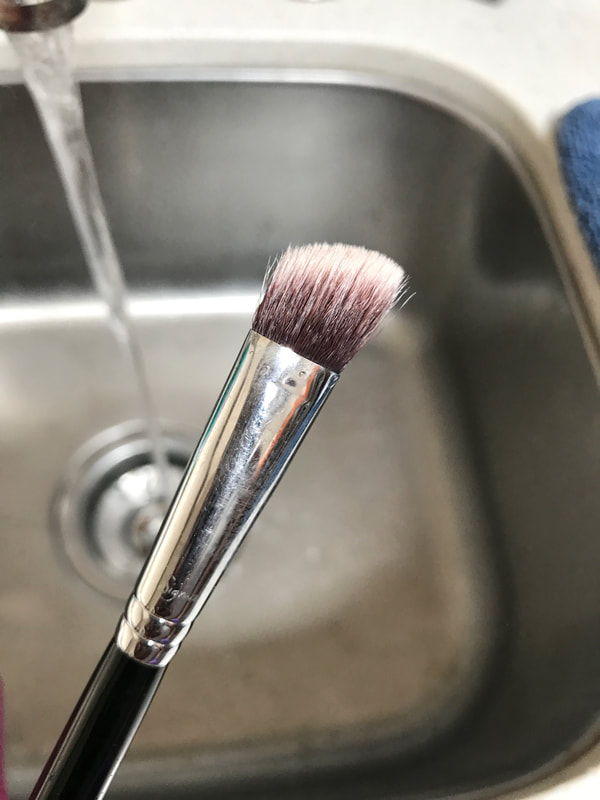
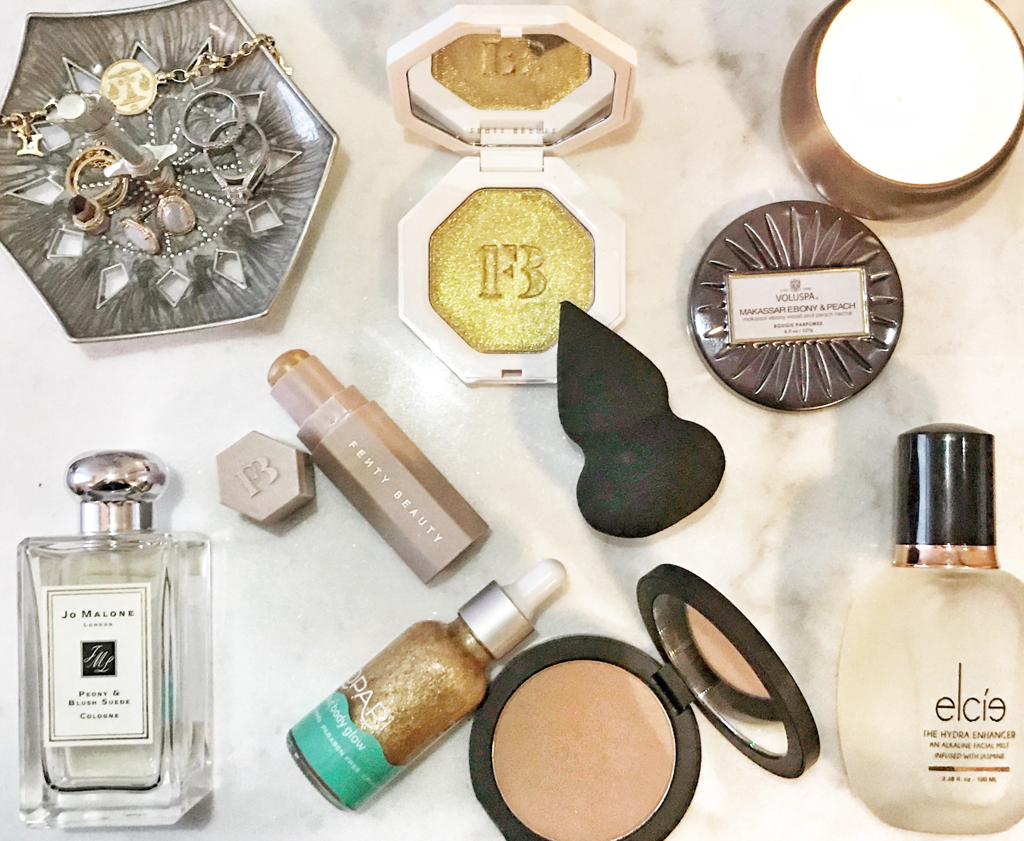 I know, I know...it’s been a while since my last post but LIFE happened. What a “cliche” right?! It’s true...I quit my 9-to-5 and I’ve had gigs almost every week. I needed to rest and now I’m ready to get back in the groove of things! Anyway, since all this craziness, I’ve purchased a few things that I’ve come to LOVE and wanted to share with you all my experiences with everything featured in this post. Are ya ready?! 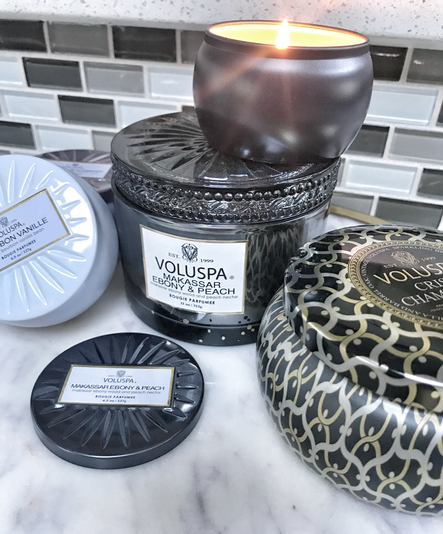 Voluspa Candles In the beginning of our marriage, my husband has come to find that my love of candles is real. The ambience it can create, the romantic mood lighting, the fragrances evoking memories you forgot you had...it’s amazing. Voluspa is one of my fave candle brands. A few reasons why: the cute and reusable packaging; the fragrance blends; its coconut, paraben & sulfate-free base; and the fact the products undergo sustainable manufacturing. I’m really loving their “Prosecco Rose” and “Makassar Ebony & Peach” fragrances. Both have lightly sweet scents. Prices range from $10-$200 depending on style but I bought mine at the Nordstrom Anniversary Sale. Still, if you’re wanting to purchase one to experience the quality for yourself, you can buy these at www.voluspa.com or www.nordstrom.com ❤️ | All candles are made in the USA. 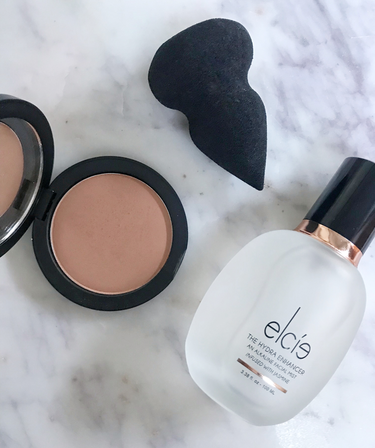 Elcie Cosmetics by Lilit Cardanian Like every beauty junkie, I’m always in search of the next best thing. The beauty industry is constantly coming up with innovative items. Lilit Cardanian, a makeup guru I follow on Instagram, invented a specially shaped makeup sponge called “the Velvet Sponge” that reminds me a little of a gnome hat. Its ergonomic design makes it comfortable to fit in your hand when applying makeup. It’s latex-free and grows twice its size when wet (using this product wet/damp is best, in my opinion, for that airbrushed effect). The pointed tip reaches into the deeper areas of the face and lends a more precise application whereas the more bulbous end is meant for the larger areas of the face (or body). $18 Her “Hydra Enhancer” alkaline facial mist smells fresh and light (it’s infused with jasmine). It is meant to be used as a setting spray or a makeup refresher throughout the day. Its fragrance is a new fave along with my MAC’s Studio Fix+. 😊 The alkaline properties of this spray is supposed to help fight free radicals and is known to have anti-aging benefits. The mist comes beautifully packaged in a frosted, glass bottle | 3.38 fl. oz./100 ml | $35 The bronzer is a 3rd fave within the brand and I’ve been using it every day since I received it. There is 9.0 grams worth of product and comes in compact form. The packaging is a matte black finish compact that flips open easily so you don’t have to worry about snagging your nails. It doesn’t come with a sponge applicator but that’s okay with me since I like to apply with a fluffy brush. Colors come in 4 shades depending on skin tone (I bought tan, the 3rd color in the line). It’s talc-free and gives you a naturally-bronzed glow without the shimmer. | $30 Products listed above are all made made in the USA and can be purchased on www.elciecosmetics.com  Peony & Blush Suede by JO MALONE I actually heard about the Peony & Blush Suede scent from several people and thought I’d check it out for myself. Visited my local Nordstrom & ended up purchasing a 3.4 fl. oz. bottle of their cologne. The fragrance is of a light floral and has notes of red apple, rose, jasmine, and gillyflower. If you find that you’re not keen on this fragrance, there are so many more scents to choose from as well as other personal care products and home fragrances. | $65 - $135 and made in England | www.jomalone.com OR www.nordstrom.com  Kopari Coconut Body Glow This little gem came in a sample kit from Sephora (the sample I have is probably 1 oz). I actually bought this set from BEFORE (and specifically for) our family trip to Maui and I used it every time I wore my off-the-shoulder tops. I made sure I highlighted my decolletage area - especially my collarbones and shoulders. The reason why this is still a favorite of mine this Fall season is because I still occasionally wear my off-the-shoulder tops and this product is reminiscent of my time in Hawaii. While you can see through the packaging that it's a pretty gold shimmer, it is just THAT - shimmer (not that overly chunky glitter that you'd probably wear if you were thirteen years old). The smell is pleasant and lightly-scented of, well, coconut with a hint of gardenia and your skin soaks up the moisture as soon as you slather the oil on. Since the one I have is a sample bottle, you can get the regular size (3.4 fl. oz) at www.koparibeauty.com for $42. Kind of pricey, you say? Well, a little goes a long way and (I believe) you get your money's worth. An added bonus is that these products are vegan, phthalate-free, silicone-free, cruelty-free, & paraben-free. Once I run out of mine, I fully intend to purchase the full size. Coconuts are sourced from the Philippines (also my homeland). USER TIP: Since this is an organic product, the formula will harden in cold temps. Be sure to warm this up by placing in warm water for a few minutes and test on a small area on your hand. Whatever you do, DO NOT MICROWAVE. FENTY BEAUTY: Rihanna’s debut cosmetic line has gotten off to a great start. My first couple visits to Sephora to check out her new line was somewhat of a bummer - they ran out of my foundation shade and a few other products I wanted to try. Still I was able to get a sample (shade 320 because that's what I was matched at) of her Pro Filt'R foundation. I ended up shopping on the Fenty site and bought the two products above along with her universal gloss and foundation (more on these later). The swatches on my hand (pictured above) feature two different products from her line...top swatch is of the Match Stix Shimmer Skinstick in Blonde ($25) and the bottom swatch is the Killawatt Freestyle Highlighter in Trophy Wife ($34). The skin stick is a more subtle version on the freestyle highlighter and is a bit more blendable. While it looks like a cream, it actually applies as a cream-to-powder finish. I use it on the highest points of my face and blend with my finger so it's not so obvious. It's packaged in a nice, soft pink hexagon shaped tube. The tube is unique in that it's magnetic feature can be paired (or stuck) with a concealer or contour stick available in her line. Its size (7.10 g/0.25 oz) is easy to throw in your purse for the times you’d like a midday touch-up or a pop of shimmer for a night out on the town. As for her freestyle highlighter...it’s a bit more pigmented and a little more “fun” for those not afraid of color. I love gold and I realized I used a lot of gold for my shoots this past month (thus the reason being that it made it to my list of faves). Colors need to pop a bit more for photos because the camera tends to tone it down a bit so pigments need to be stronger and this product was perfect. I didn't have to worry about layering colors and mediums to get that perfect, saturated color. | All items are cruelty-free and made in the USA. Products can be purchased at www.fentybeauty.com OR www.sephora.com 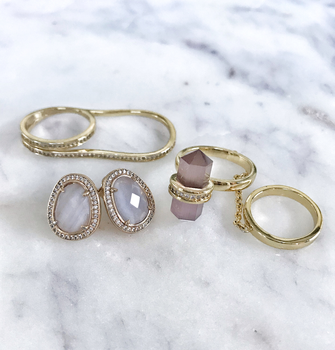 Gem goodness by Melanie Auld One of my new fave jewelry brands! I accidentally stumbled upon this brand on one of those sponsored posts on Instagram (those posts really do work!) and checked out the site. If I had the moola, I'd buy every piece she had. Unique and dainty jewelry is my thing and this site had nothing but. I bought a few pieces of hers but these pictured here were my most worn for the past month. Unfortunately, the rings I have pictured are no longer on her site but I get so many compliments and they're great conversation starters. The earrings, however, are still available as of today (Oversized Studs in Moonstone surrounded by micro-pave CZ with 14k gold plating over brass) for $118. I will say that my only issue with my last purchase was that I received a notification of my items being delivered but I didn't actually receive my order. I emailed their customer service and they responded rather quickly and were also very pleasant to work with. Turns out it was a USPS delivery issue and I ended up receiving my order shortly thereafter. With their awesome customer service and beautiful inventory, I have no doubt I will be back to their site to purchase more goodies in the future. Peruse this site and you won't be disappointed - www.melanieauld.com 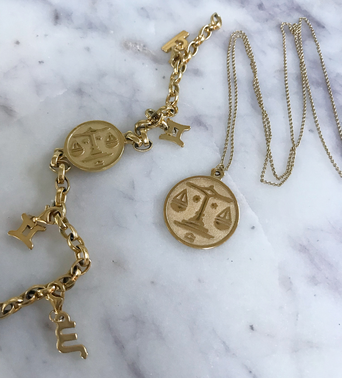 Zodiac Collection by Anna Saccone Last but not least, my most worn jewelry pieces by far. A jewelry line presented by one of my fave YouTubers/Instagrammers, Anna Saccone-Joly, I was really excited when she announced her launch on her channel and social media handles. Not only is she a wonderful wife and doting mother to 3 beautiful children, she has impeccable taste. She came up with this line a couple years ago to replicate the original necklace she received from her late father. In designing this line, it was near and dear to her heart. I often saw her wearing her necklace and wanted to own a piece as well. The necklaces came in 3 sizes - short, medium, and long. I ordered the rose gold Libra necklace in the shortest size. The pieces were gold plated over sterling silver and of really good quality. Not once has it tarnished. I loved it so much that I ended up buying the gold necklace a year later in the mid length as well as the gold charm bracelet with charms representing each member of my family. Anna is coming out with another line soon (due out Christmas 2017). To get updates, visit her Stilnest page and sign up for notifications regarding her upcoming line. I can't wait to see what she has in store for us! This is it folks and I plan to do monthly faves at the end of each month. I hope you all enjoyed reading it as much as I enjoyed writing it and that you're able to find some faves from these brands as well. ~XOXO, Mari As a makeup artist, I have my fair share of dirty brushes and beauty blenders. - let me tell ya...I have a lot of them!!! So, needless to say, deep cleaning my tools between clients can be daunting and painstaking. Over the years, I've learned some tips along the way to help my task run smoother. But you know what? You don't have to be a makeup artist to perform this task - one should clean their own personal set of brushes on a regular basis...at least once a week...although, I have been known to go without washes for a couple weeks. Ack. For sure, I do NOT skip this task of deep cleansing when it comes to client brushes. Cleanliness is key. When I deep clean the brushes, I clean multiple brushes simultaneously with either my beauty blender cleanser or baby shampoo along with lukewarm water. I rub these on a Sigma glove (you'll see a snippet of it somewhere down below) to help with the process (go to www.sigmabeauty.com and you'll find these cool gadgets in their Brush Care section). You can use your hands but I don't because I have dry skin. After rinsing, I lay my brushes flat on a clean towel. If you store them upright, the water will ruin the ferrules (this is the metal or plastic piece connecting the brush hairs to the handle). You'll risk these pieces rusting or even cause loosening of the brush hairs. By laying them sideways, you alleviate these issues. 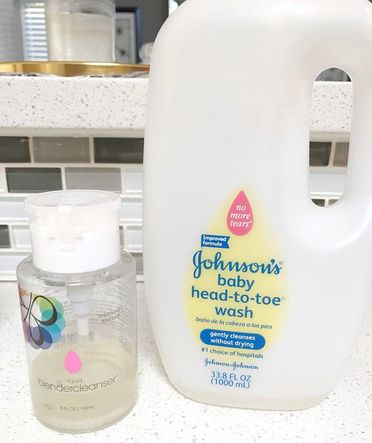 Now for the really dirty brushes and sponges...these are the ones where your usual cleansers just won't do. See my examples below: All you need are some common household items: a plate, measuring spoons, extra virgin olive oil, and mild dish washing liquid. You can use pure olive oil but I like the extra virgin because it's thinner in consistency and doesn't leave any of the oily residue on the bristles, if done properly. QUICK TIP: If you have really dry hands like me, I recommend using latex/latex-free gloves to protect your skin. 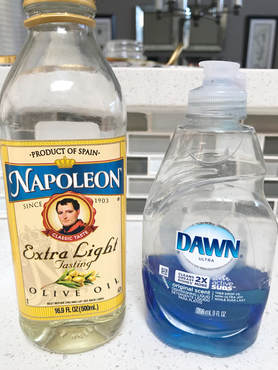 Usually I start by wetting the brush or sponge with warm water. If you have a beauty blender, soak until it expands then sqeeze excess if it isn't damp already. I follow a 3 : 1 ratio (3 tbsp of dish soap to 1 tbsp of oil). Just know that if you have more than the recommended amount of oil in the mixture, it will leave an oily residue on your items when dry...and you don't want that. Because I do it often, I usually eyeball my measurements based on the amount of brushes or sponges I need to clean. When ready, roll the brush or sponge into the concoction and coat the surface with a nice, thin layer and start scrubbing (for brushes) or rubbing (for sponges), working the formula in. It shouldn't take too long...I'd estimate about 15-30 seconds each depending on how badly soiled your tools are. You may need to repeat the steps a couple more times but I don't find that to be an issue. When finished, they should look a little bit like this.... Just like new, right?! Generally, you'd want to clean your brushes/sponges once a week (okay, okay, sometimes I go two weeks - I'm busy alright)! Sebum, oil, sweat, and dirt left on them can cause skin issues so try to be consistent in cleaning your tools. Not only will you be good to your skin but your tools will last longer. I've had brushes for over 5 years and they're still as good as when I first bought them. Of course, for makeup artists, you should deep clean between jobs.
I hope you're able to find this information helpful. Try this on your brushes/sponges and let me know how you like it! ~XOXO, Mari |
Meet MariWelcome to my blog where I share my inner thoughts on life and all things I love - beauty, home decor and design, amazing food, our family travels, and fashion! Archives
February 2021
|


 RSS Feed
|
|

|