In this video, I am showing you how to create a cozy bed that is IG-worthy! 😉 Subscribe and click that notification bell for updates!
0 Comments
2021 started off with a bang in our household as far as organization! I told myself that we need to find a way to get rid of things we don't need and that we need to tackle the mess behind closed doors. My kids and I got to work and organized most of our closets but our pantry made the most dramatic difference. We filmed this video in a matter of a few days and we're so glad we're done! On to the next house project!
7 Steps to pantry organization1) Take measurements (W x H x D) 2) Make sure the containers are dishwasher-safe! 3) Assemble a team 4) Start with a blank slate 5) Transfer & Relocate 6) Layout (organization step) 7) Label! I hope that this video gives you some inspiration and that you are able to get things organized in your homes. Like me, I can bet you'll notice a big difference in how you feel and how easier you can breathe once things are in their rightful places!
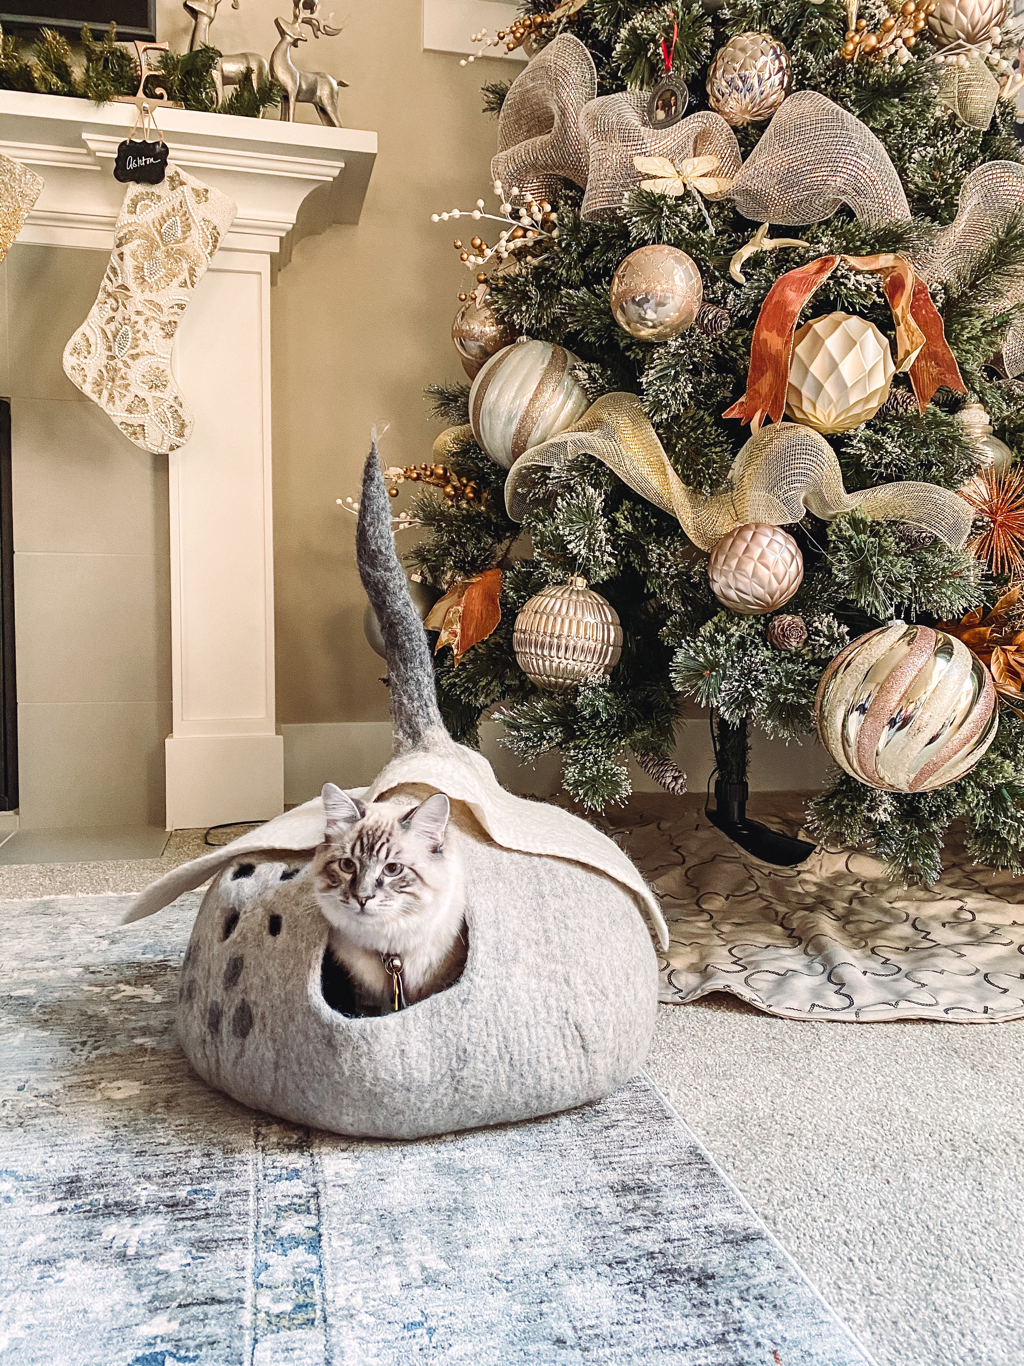
~XOXO, Mari It's nearly Christmas (and, most importantly, the END of a horrendous year) - I think it's safe to say most of us are ready to, once again, start anew. Since most states are not allowed to do big gatherings, I thought I'd film a quick home tour of my current holiday decor to "invite" you lovely people over virtually. Wanted to send some holiday wishes and love to others as well, particularly those that are feeling sad or alone during these tough times. Merry Christmas everyone and sending you virtual hugs. ~XOXO, Mari 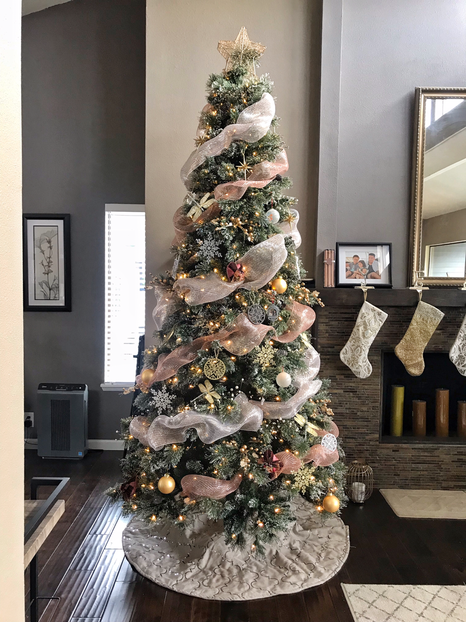 Tran Christmas Tree 2018 It's been a tried and true Manalo-Tran family tradition to decorate the day after Thanksgiving. The reason being most of us are home from school and work. It's a great workout and a sure way to burn off calories from the night before (oh believe me, we can sweat depending on how many people are helping) and we get some family time in. We don't necessarily finish all of the decorating but putting up the tree and stockings the day after TG are a must for us so we can enjoy them just a little bit longer. Throughout the day/week, I start to slowly incorporate holiday decor, listen to Christmas music, and watch cheesy and heartwarming Christmas movies. Please NOTE that the tips I give here are meant more for artificial trees. Natural trees may be a little more fragile (and it's been a while since I've decorated a real tree - like 25 years or so) but, if I ever do one again, I'll definitely write about that! :-) After our Christmas tree is all decorated, I'll post a photo and I'll get requests to go over people's homes and decorate their trees! This inspired me to write a little something to help any of you that may be stuck in a rut or don't know where to begin. Our style is more on the glam side but I love all different types - Scandinavian, traditional, farmhouse, etc. No matter what your style, you can incorporate some of my pointers into your holiday decorating. Also, feel free to omit anything that doesn't quite go with your design aesthetic - the point is to have fun with it and not to think so hard! So, if you need some inspiration, check out my tips on how we trim our tree (I've also included some tips and info on where to shop)! 1. Fluffing
2. Wire Ribbon and/or MeshSince our tree is pre-lit, we usually start out dressing it with wire ribbon or mesh. Otherwise, if it were a real or faux tree with NO lights, I would add a bunch of string lights first. I've heard the rule of 100 lights per foot but I'd be worried about the fire hazard that could cause. IMHO (this means "in my honest opinion" for you acronym newbies) I'd save this rule for the bottom 1/3 of the tree since it needs more lights than the middle and top sections. For the ribbon or mesh, you can play with the placement any way you like. This year, I took mesh around the tree by spiraling downwards and used two different colors. You can also cut in 3-4' strips and tuck them randomly on the tree and either go vertically or diagonally - be careful placing horizontally as this could make the tree look squat or cut off from other sections. My trick for the ribbon/mesh is to loosely tuck approximately every 8-10" into the tree because it looks flowy as opposed to forced. I like wire ribbon because it does what I want it to and I don't worry about it easily slipping off the branches. With mesh (I like to use either the 6" or 12" spools) - the material sticks to the bristles easily so you don't have to worry too much on working to attach it.  A company mini-tree I worked on 3. Interesting ShapesOne thing I notice with some people is that they only stick to ball ornaments of the same size and they get A LOT of them, too! This can get boring fast and, frankly, doesn't give your tree much character nor does it showcase your personality or that of your family's. Look for shapes out of the ordinary and, when you like something - grab 4-5 of those shapes. You don't need a ton of ornaments, just a few special sets and you're good to go. Although, I will say it is pretty when your tree's full of ornaments but, keep in mind, what you put up will eventually have to come down! Think ahead and ask yourself if you're okay with that! Going back to special shapes, I have these starburst spherical ornaments that I found one day about 15 years ago and they're still some of my favorites. Even though they're round like the typical ball ornaments, their spikes give it that extra "oomph." In addition to these we have eggs, hedgehogs, dragonflies, snowflakes, north stars, etc. You can even do homemade ornaments, picture ornaments - the choices are endless! 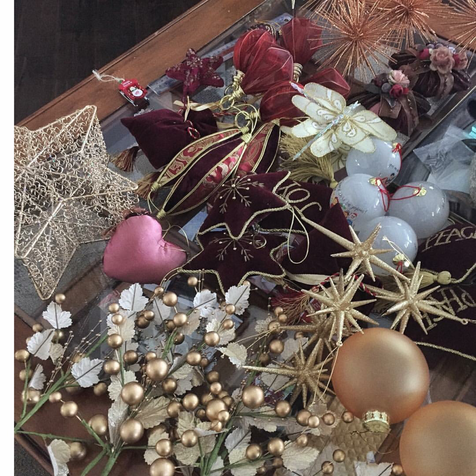 Our ornaments - most have something unique about them...even the round ones! HOT Tip: Some of you may already know this but, if you ever run out of ornament hangers/hooks, you can use paper clips! Most likely you already have them in a home office or, if not, just head to your local store and pick some up - they're inexpensive to buy!  Paperclipped 4. Space elements outSpacing like-colors or like-items is one of the keys to achieving a well-balanced tree or design. Even colors that aren't quite the same in color but are in the same color family would look better spaced out. This can sometimes be hard if you have a lot of the same colors...just do the best you can. If you find it difficult - no biggie - just move on! You can achieve this concept if you imagine an invisible triangle throughout several areas of your tree. You can place ornaments at imaginary points of your triangle. Or you can think of it this way...place colors and/or items at different levels throughout the tree (e.g. some items go higher up while other ones are placed lower).  Space items out as best as you can. 5. Size VarietyTo vary the sizing of the ornaments or pieces that will go on the tree will add to its character. There are some rules that some generally go by (i.e. the largest pieces go towards the bottom and the smaller ones towards the top). I think you can definitely place bigger ornaments higher if there's, again, balance. I do, however, like to follow the rule that smaller goes on top only because of how the tree tapers and bigger ornaments will overpower the area. Also, I generally tend to get more medium and large-sized ornaments because the smaller ones tend to get lost in the tree so I'll usually save the really small ones (like ping-pong sizes) as fillers for a vase or even attached to a wreath or garland. 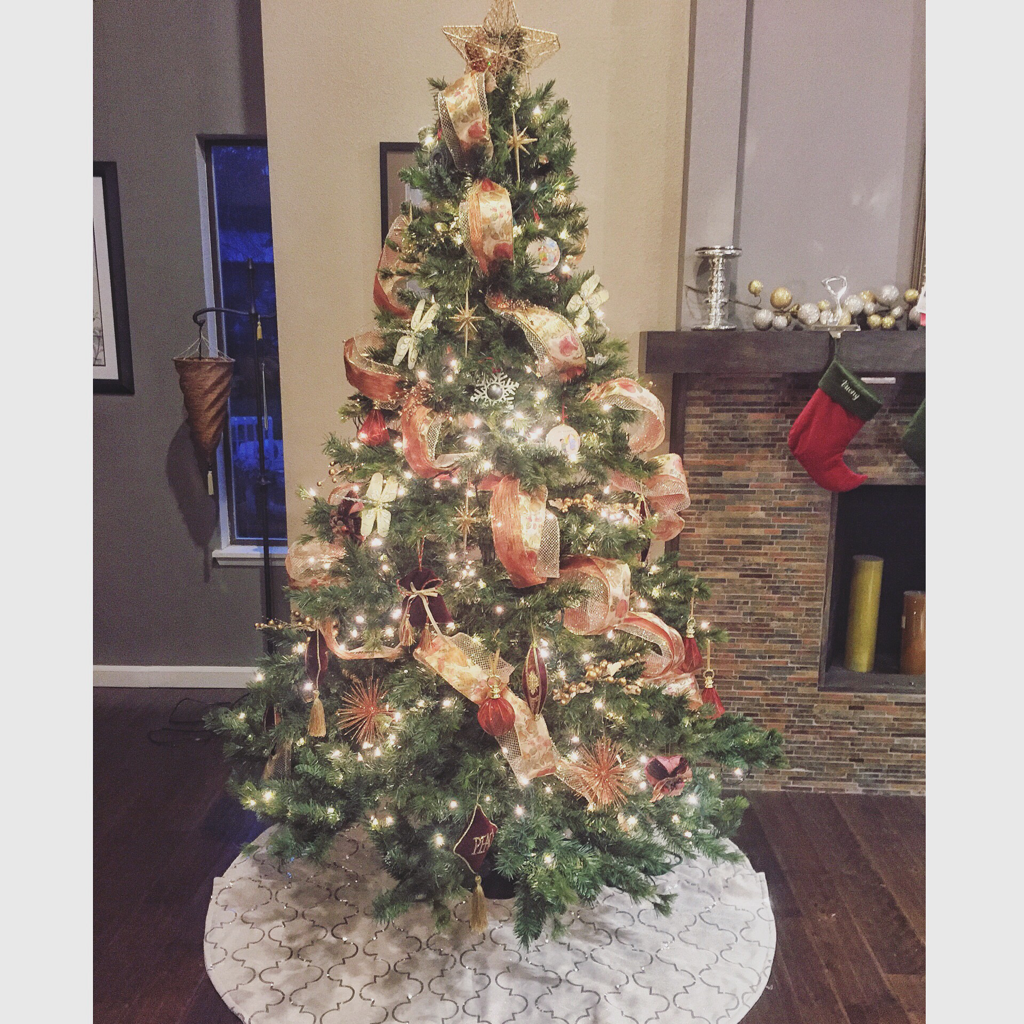 6. FillersFillers are what really dress up the tree, in my opinion. This is what I use to really give any tree I decorate that certain je n'ais se quoi - y'all know what I'm talking about - it sets your tree apart from others out there. Most of these fillers come in the form of "picks" which you can find at any craft store or a place selling specialized Christmas decor (I even found bundles at hardware stores in the holiday section)! I like to use branches, artificial berries, gilded ferns, pine cones, etc. I've seen feathers, animal shapes, candy canes, poinsettia blooms, etc. There are so many different types that I'm sure you'll find something you fancy. Like the special shaped ornaments, you'd want to pick up a few at a time...for bigger ones, pick up 4-5 pieces; for medium-sized ones, pick up 6-8 pieces; for smaller ones, maybe 9-10 pieces. You insert them randomly around the tree where there are more open spaces or anywhere that needs a little something extra. Space them out from one another so that one section isn't overloaded while another area of the tree looks bare.  Can you spot all the fillers?! Some aren't as obvious... 7. Skirt and TopperFinishing off the tree, you don’t have to go traditional. You can do a blanket and wrap it around the base, use a bucket or planter, or even a whole roll of 2' wide mesh! HOT Tip: Add a bunch of crinkled tissue paper under the tree skirt to beef it up so it’s not so flat. With toppers, they can get pretty expensive depending on what you want. They can also be ill-fitting. I have one that doesn’t quite fit the tip of any tree I’ve bought so that kind of sucks! To mitigate the issue I use a basket, picks or mesh. See the photos below... if you’re wondering why I use a basket, it’s because the opening is so big and it sits atop the tree perfectly. Keep in mind you’ve got to take in consideration its scale and shape. Mine is star-shaped and on the smaller side so it’s perfect for our tree. Where to SHOP I've gotten our ornaments at many different stores throughout the years. There are some areas that you can spend more or less depending on which item. I do believe that trees should be an investment - not necessarily something that breaks the bank, but something that'll last 10 years or more. You can tell the difference in the bristles and how sturdy its construction is. As for ornaments, you can save. Glass ornaments, however, are best when they're thicker (in my opinion), otherwise the glass will be brittle. I've had the best of both low and high end glass pieces and I've already broken a bunch of the cheaper ones while my more quality pieces are standing the test of time. For picks, you can go either way but I've found some at a steal at discount places. The following places are where you can go and get your decor pieces:
Of course there are always DIY ornaments - these are fun for the kids or for those wanting to save a lot more...wood crafts, cookie ornaments, paper/paper/popcorn garlands, photo ornaments, etc.! There are countless craft ideas - let your imaginations run wild! Christmas Scenes throughout the YearsHopefully, these tips were helpful to you and that you're confident in trimming your tree(s) this year! Tag me on instagram @mari_tran78 to share your beautiful trees with me!
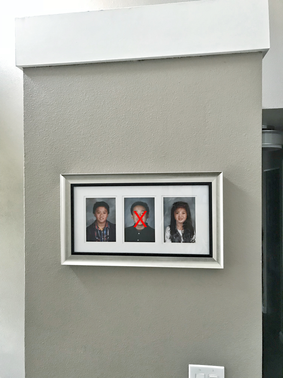
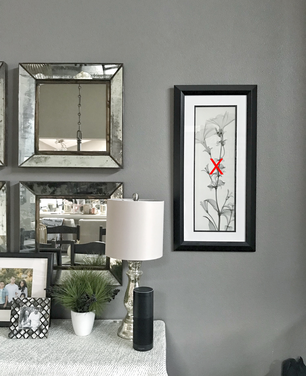
~XOXO, Mari I'm frequently asked to give my opinions on home decor. Yes I went to design school but I am, in no way, an expert. I am, however, a big nerd because I love to read about anything having to do with home design and I try to keep up with current trends. Over the years, my design sense and style have changed (I pretty much like everything) and, at my age, I've made my fair share of mistakes and have tried to learn from them. I'm sure, though, I'll be making more mistakes but that's OKAY. Since I make them, you don't have to! HA! I'm usually pretty happy to share my thoughts to help another person out so I thought I'd write a little bit about what's worked for me. Most of the images you'll see here are of my own home and is shown, as is, to represent how my decor is seen on an everyday basis. Without further ado, read on for my decor tips and tricks! 1) Hang Drapes to Heighten a RoomThis is one trick I always use in any space I design...especially when I am working with low ceilings. The lower the ceiling, I generally will hang window treatments above the windows to give the illusion of a taller room. Generally it's about 1-1.5 ft above the top of the window. I tend to go with full length drapes that either barely touch the ground or will pool around just a bit. If the panels are too short, (like, say, a foot off the ground), it looks undone. Too long, then it just looks sloppy. 2) Expand the Size of Windows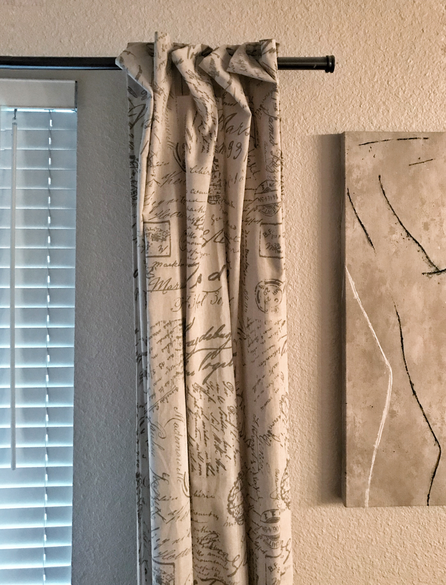 We moved into a 1979 split level and every room was outdated. For example, our bedroom has these really narrow corner windows, which, we wanted to either close off or re-position but both options were out of our budget, unfortunately. So, we decided to work with what we got. To do so, we bought a corner rod and extended the rod a little over a foot past the window's edge. Hanging each panel next to each edge gave the illusion of larger/wider windows. 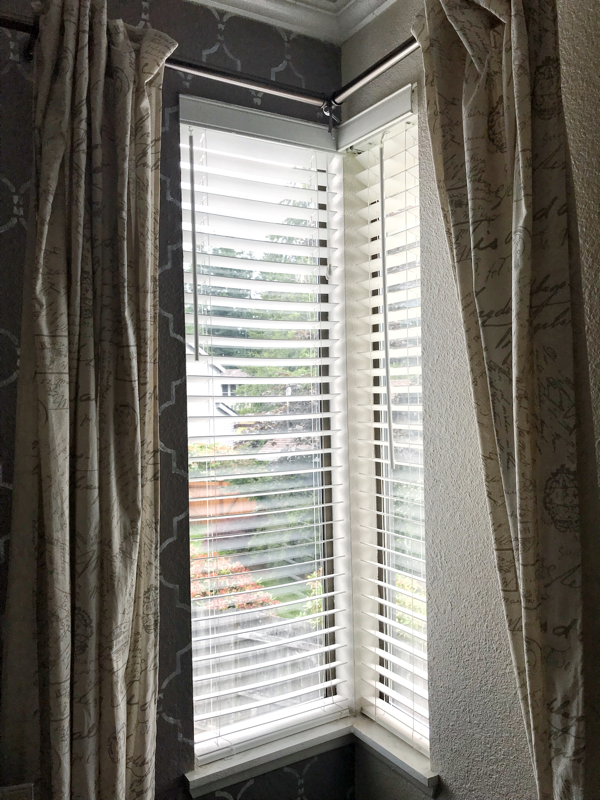 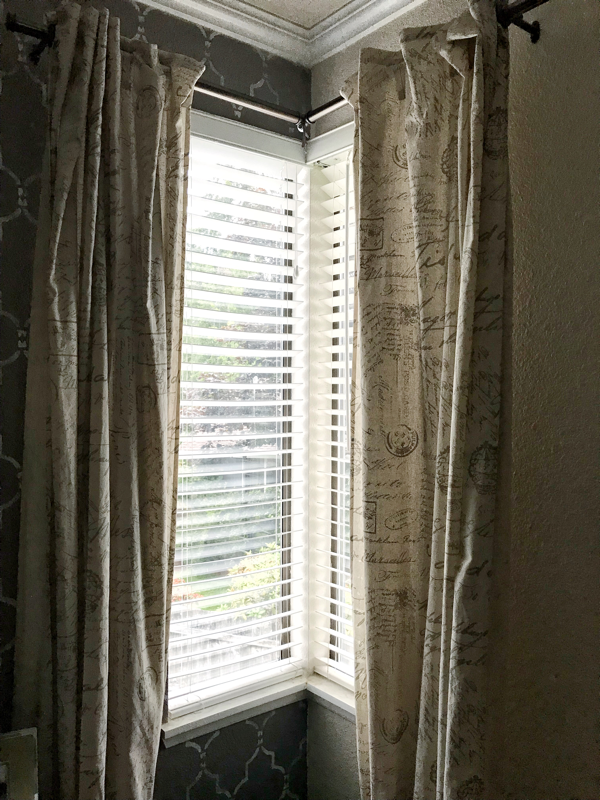 3) Hanging Artwork at Eye LevelMany times I see artwork hung way too high. Anytime I hang wall art or frames, it is at eye level - however, it is NOT necessarily at my eye level (since I'm about 5'3") but I like to focus the center of the piece at around 5'7" - give or take a couple inches. This is the average height out there for most people. When I say "center" I don't mean the center of the top edge but the middle center of the piece (see the "X's" marked on the photos).
4) Table Height “Rules”There are general rules on table heights (though, it's not always the case depending on the style you're going for). For coffee tables, or ottomans, I generally like that they're about the same height as the seats so it's easy for one to kick up their heels. If they're a little lower or a little higher than the seat, it's not that big a deal. If it's a drastic height difference, it looks awkward. For bedside tables, I generally ensure that the table top is level with the mattress top. If it's a few inches taller, it's not that big a deal; however, if it’s a few inches lower, it just ends up looking dinky. When at around the same level, it's easy to reach over for a book or glass of water. See the red lines in the following photos... 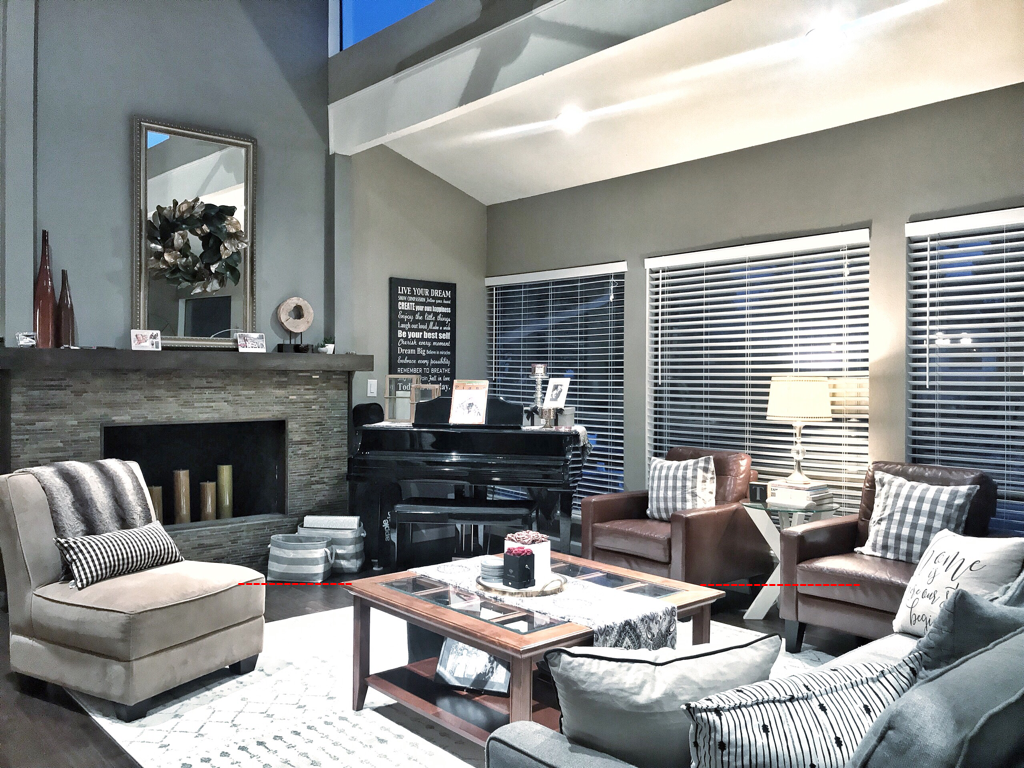 Depending on the style, table heights are generally the same as (or almost match) seat heights  Bedside tables are usually the same height as the bed 5) LayeringDecorating by layering gives just a touch of visual interest to any space. If you wanted to go just one step further, think about your space as you would accessorizing yourself with jewelry. You can either go simple (i.e. overlapping flat frames of various sizes and heights against a wall) or you can go all out (i.e. creating some sort of tablescape on a console in your entryway). It doesn't have to be expensive and you can pretty much decorate with anything you already own. Below, you'll see some layering I've done throughout my house just to give the area a little something extra. 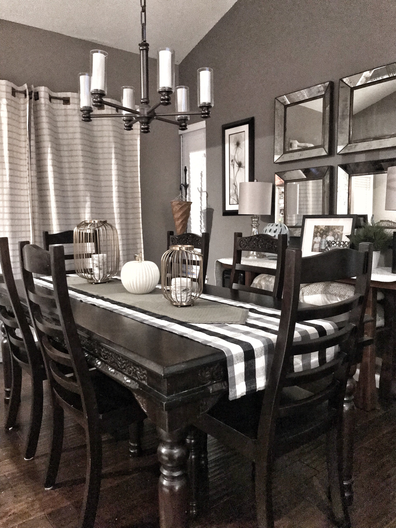 Layering table runners give the dining table depth
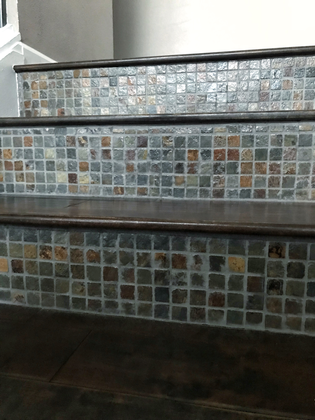
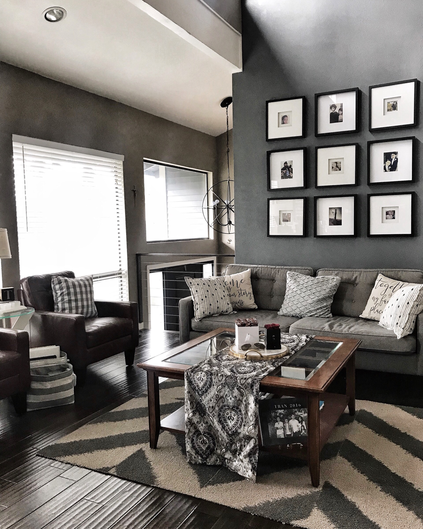
6) Area RugsNo doubt about it, area rugs help to define a space. It's something I love to use anytime I design for a client. I have incorporated this tip into some of the spaces in my own house as well. When choosing a rug, you either want to make sure most of your furniture fits right on top or fits comfortably just around its outer edges. If it's too big, it'll overpower everything in the room. If too small, then it just looks out of place. The smallest rug I've used is a 5x8" - my coffee table fit right on top while my sofa and chairs flanked each side. You definitely want to take measurements of your space to ensure that your rug fits. 7) Plants (Real & Fake)I have a VERY neutral living room and people often think I have no color in my space. If I do inject any color other than neutrals and blue, I'll do it with flowers or plants (real or fake). I DO NOT have a green thumb but I like the beauty of a simple bouquet or a no-fuss potted green plant. 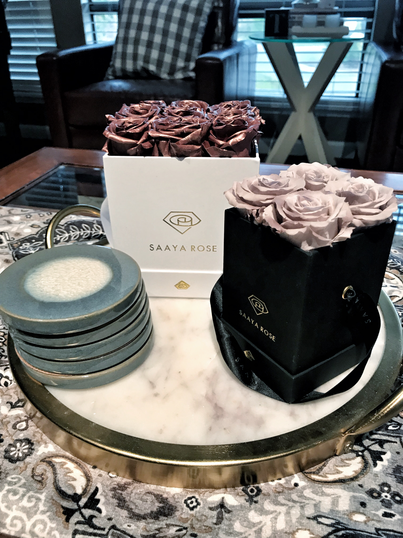 Infinity Roses by Saaya Rose - these last about a year!! I've come across real roses that don't need watering and last a year - I love this idea because I can't make real ones last a week for the life of me. For faux plants, I like when they resemble the real thing (for example, fiddle leaf trees or succulents). I'm asked all the time whether my succulents are real. So, yes, do what you can to incorporate any foliage into your home to give it some life! 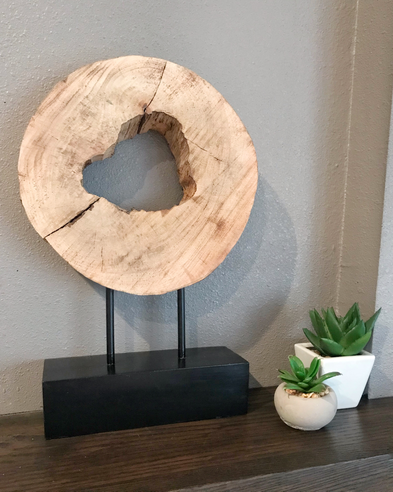 Real, hollowed out wood trunk and mini faux succulents 8) Mixing it Up (Prints, Materials, etc)Lastly, I like to mix up materials you wouldn't put together otherwise (see picture #1) and prints. As long as there's a common color or shape in each piece, you're kosher. For picture #1, when I told people my idea of what we were going to do with the stairs in our entryway, you could see them cringe. But so far, so good. There are java colors in the mosaic tiles we applied on our stair risers and it pulls the overall look together beautifully. For picture #2, you can see the different patterns going on but it all comes together because each item shares the same color(s).
I hope that you were able to read this and feel inspired to spruce up your own places. These are tricks or tips I've learned in the past few years to make our house a home. I'm sure that this will be a never-ending process because our design styles change every few years and there's always something new to be learned.
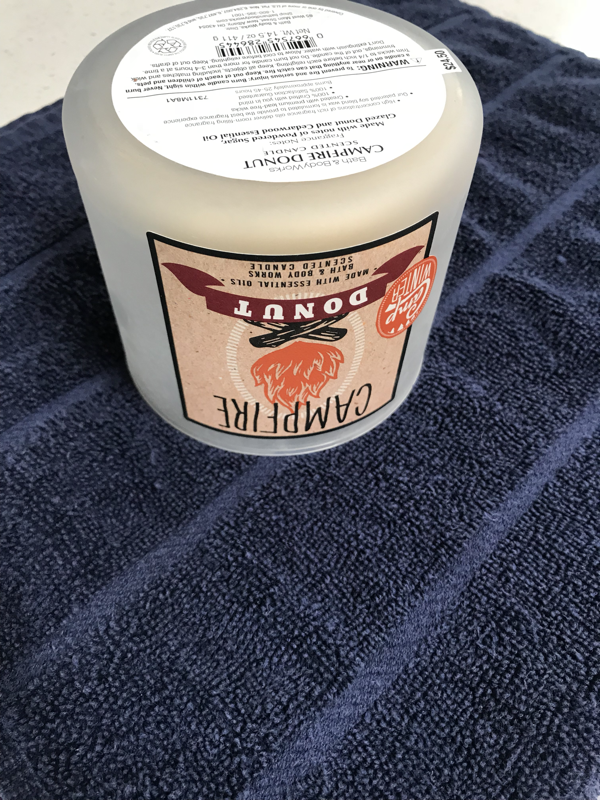
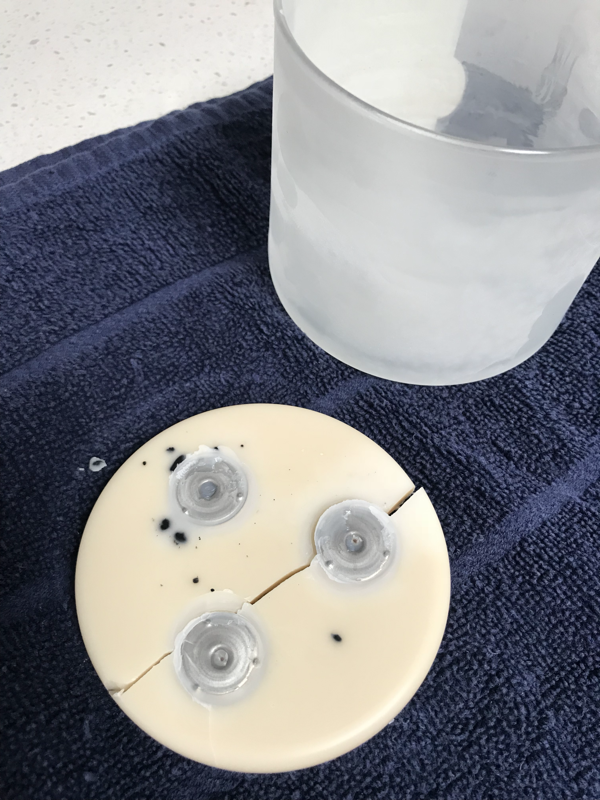
If you have any design tricks or tips, leave a comment down below because I'd love to know! ~XOXO, Mari  If you're a candle junkie like me, and you buy the kind where the wax is inside a container, you'll be left with a ton of them after they've reached their "end of life." Some people tend to throw these away but some, like me, will find a way to re-use them (or at least the containers worth keeping). Read on to see how I clean these jars and re-use them for whatever it is you need. 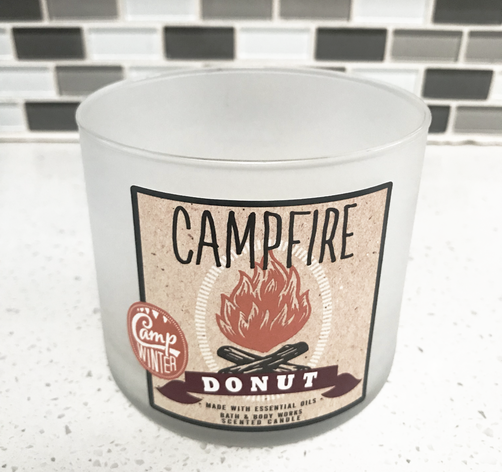 Once the wax burns down to the base of the wick, place the whole container in your freezer and leave it in for about a couple hours. The cold air will cause the wax to separate itself from the edge of the container after it hardens. 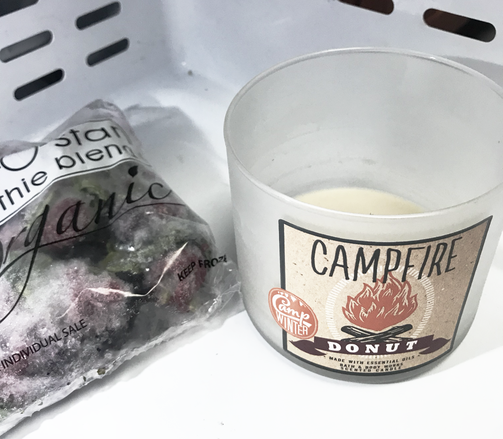 Once you remove the container from the freezer, do the following steps:
Give your container a good wash and you can use your container for anything you want - we use ours for multiple things...storage for cotton pads/balls, Q-tips, hair ties, batteries, push pins, etc. Sometimes I use it to hold makeup brushes and my roller ball perfumes. I've even used them as packaging for gifts! So, there are lots of possibilities! 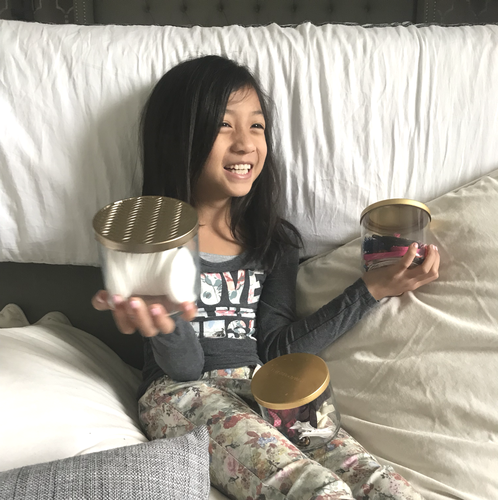 For this blog entry, I used my Bath & Body Works candle, but I've done the same with my Voluspa or Yankee candle jars.
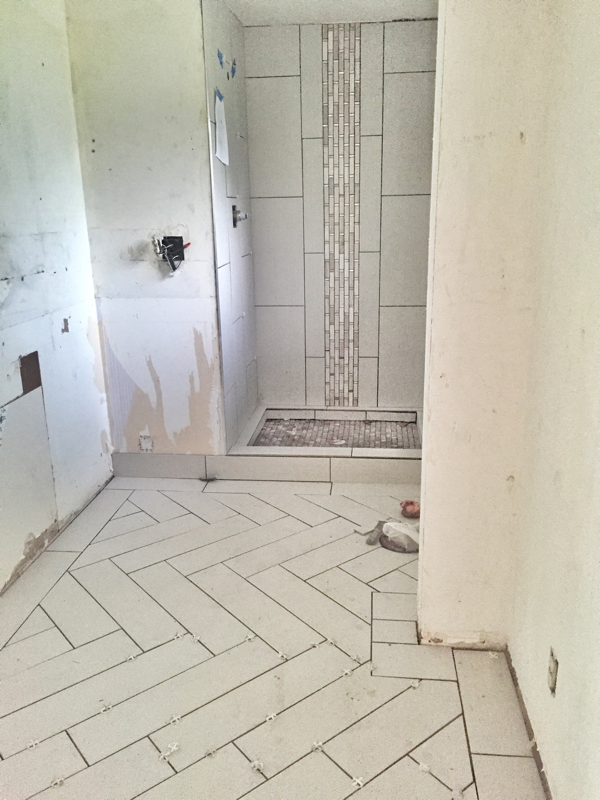
My whole family utilizes these containers in ways that work for us. If you're wanting to recycle your containers and decide to give this a try, I hope that you're able to find ways for it to work for you! ~ XOXO, Mari Our basement bathroom was, for lack of a better word, atrocious. Floral wallpaper that you might find at your grandmother's lined all four walls and were peeling at the seams. Old vinyl flooring started to chip in some areas. The laminate blue counter top, shower and musty cabinets were all dated. BEFORE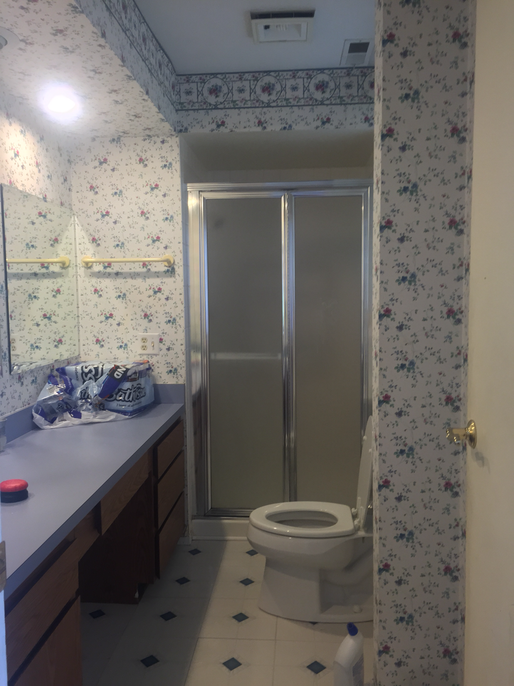 The original basement bathroom Since most of our house was redone, this had to get some lovin' as well...especially before finally opening our home to guests other than our immediate families. The laundry and garage still need to get done but those two rooms are usually off-limits so they weren't high priorities at the time. Wait til you see those rooms in a future entry! ;-) DEMOContractor: Vu Construction Like the main areas of our basement, we did a lot of it ourselves to save money but sub-contracted out for the heavy stuff. The only demo we did in that room was removing the wallpaper and cabinetry. My dad was still around and wanted to keep busy so I showed him how to remove the wallpaper. To strip the wall paper, you'll need the following... Tools needed:
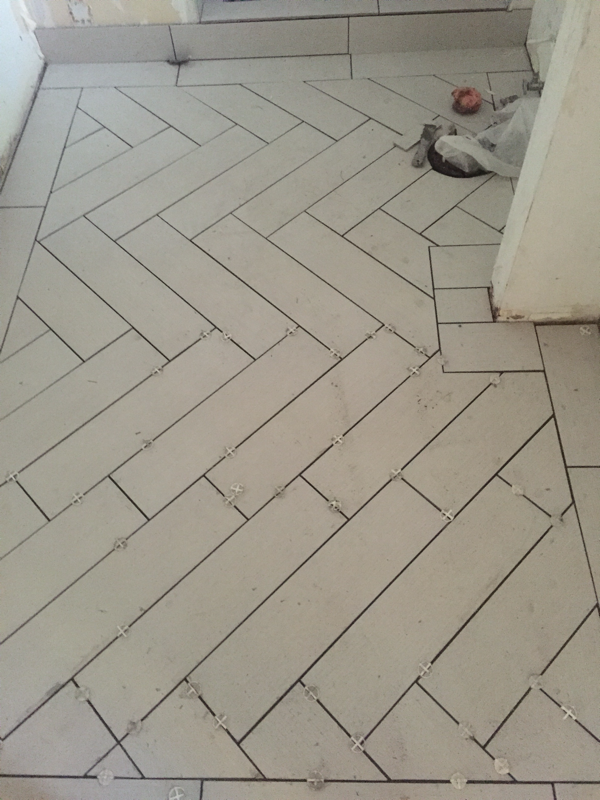
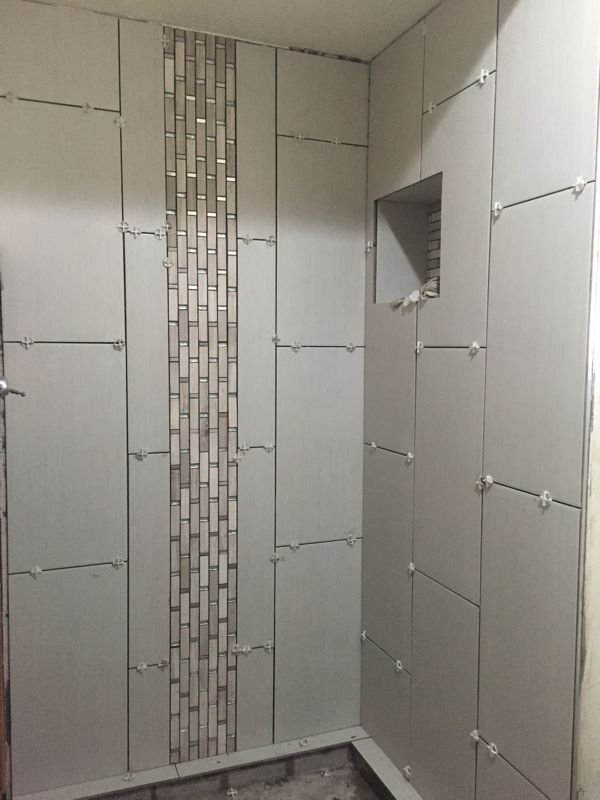
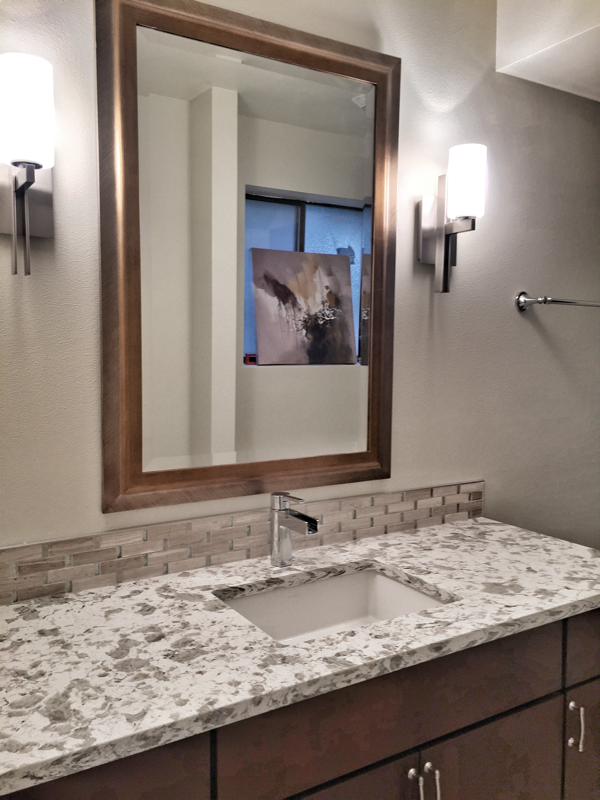
Then, we made a 1 : 1 solution to help strip it off:
Scrape the wallpaper with the scoring tool by following its instructions to create punctures, then spritz the solution and let it saturate. Use the sponge to help spread the liquid around and seep through the holes. Wait about 10-15 minutes then rip the wallpaper off. You may need a spatula to get to the stubborn and hard-to-reach areas. When stripping the paper, we found what appeared to be mold coming through the walls. NOT GOOD. So, the contractor was notified to take care of the issue. 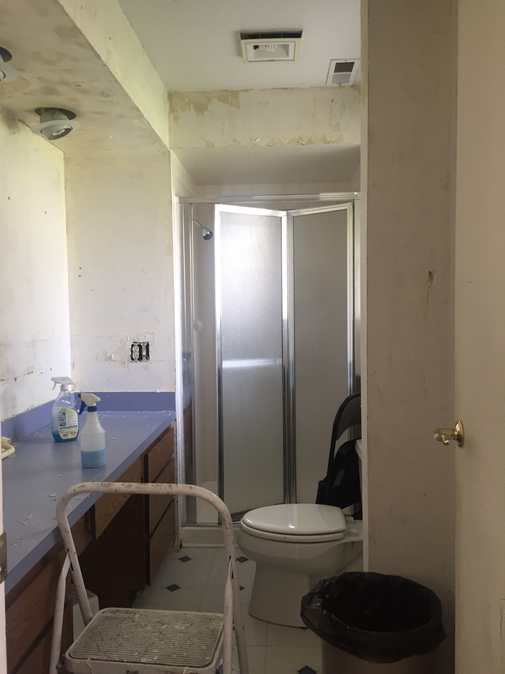 It's already looking better! INSTALLATIONWe went to Home Depot to pick up all the tile we wanted in coordinating colors. We found these new 4" strip tiles, which, I then had an "A-HA" moment...I always wanted herringbone floors so that's the pattern we went with. When telling the contractors, they had this look like, "are you freaking serious?" They didn't say that aloud but I could tell in their eyes. LOL. This was more labor intensive for them but it was worth it in the end. Looking closely at the tile, they have this subtle striated pattern but looks a bit solid with texture from afar. The mosaic wall tile in the shower have glass accents within them while the floor mosaic tile is a dark-ish marble. My husband thought for sure it would look bad... TIP for you: If you're going to mix materials, make sure there is a common element or color, and everything will tie in together at the end. Also, when choosing your materials, see them in person to touch them and compare the colors because the coloring may be "off" online. The only thing we took a chance with was the shower door, which, we bought on Amazon. We were relieved (and lucky) it fit perfectly. For the counter-top, we chose a very heavily patterned quartz. I hate to say that even I was unsure because it's on the busier side but I was pleased with the outcome. It didn't look too bad at all. Again, you can see that there are common colors between the counter top and tile back splash. 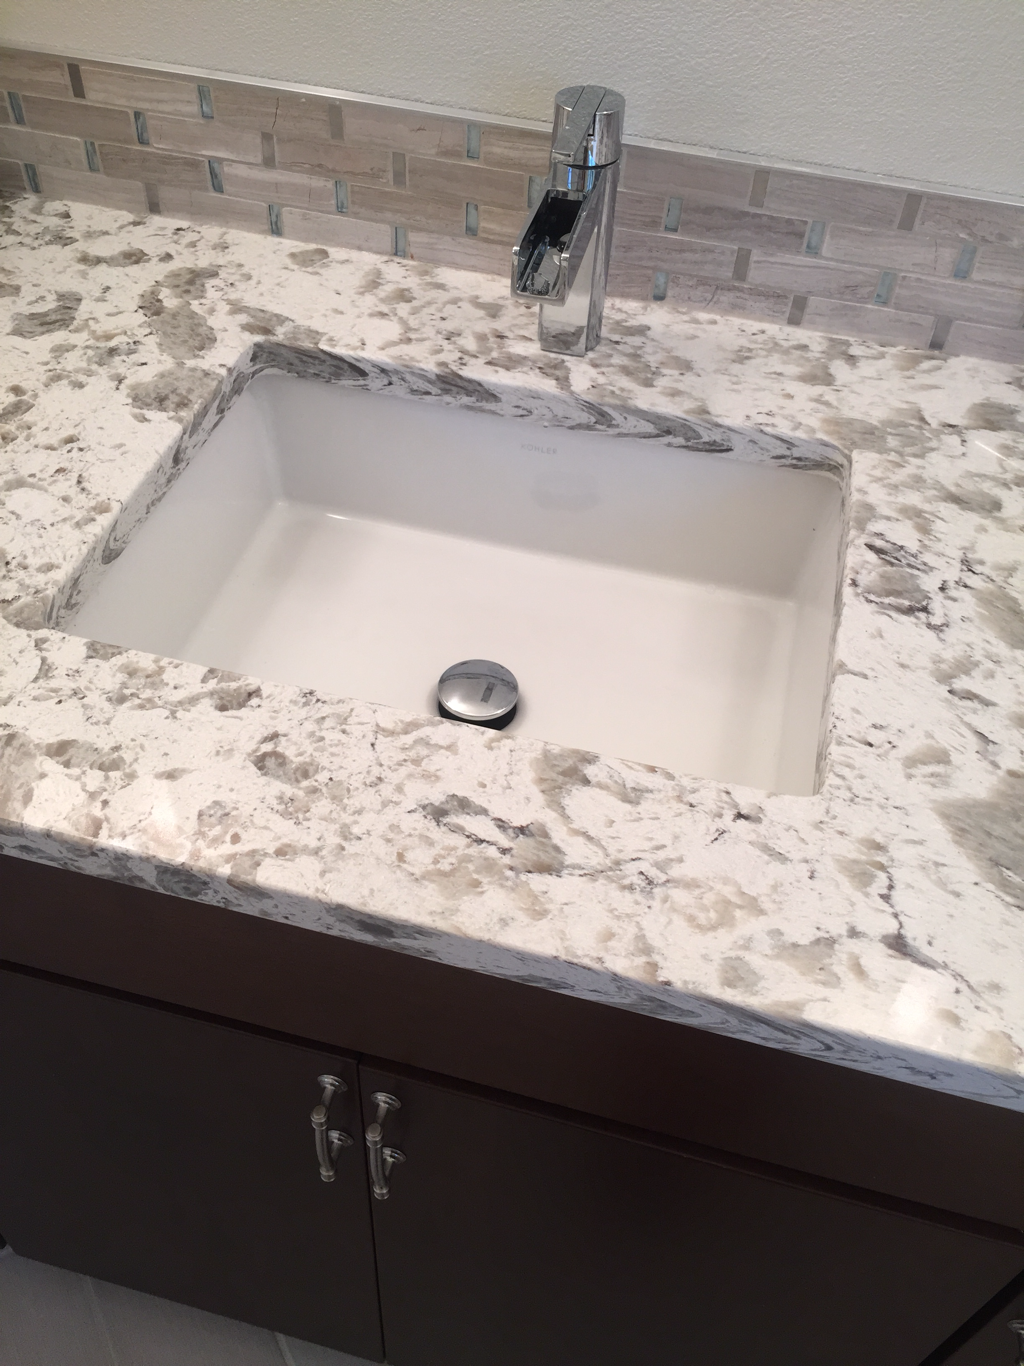 AFTERBelow is our finished bathroom. We wanted bright, open, and contemporary. I love that we were able to achieve that. Looking at it - actually, at almost everything in our home - really affirmed my ability as a designer. Still there are some things I would've done differently but, as always, I learn as I go. Everyone that has come through our home has complimented this bathroom and even some of my kids' friends say it's their fave. LOL 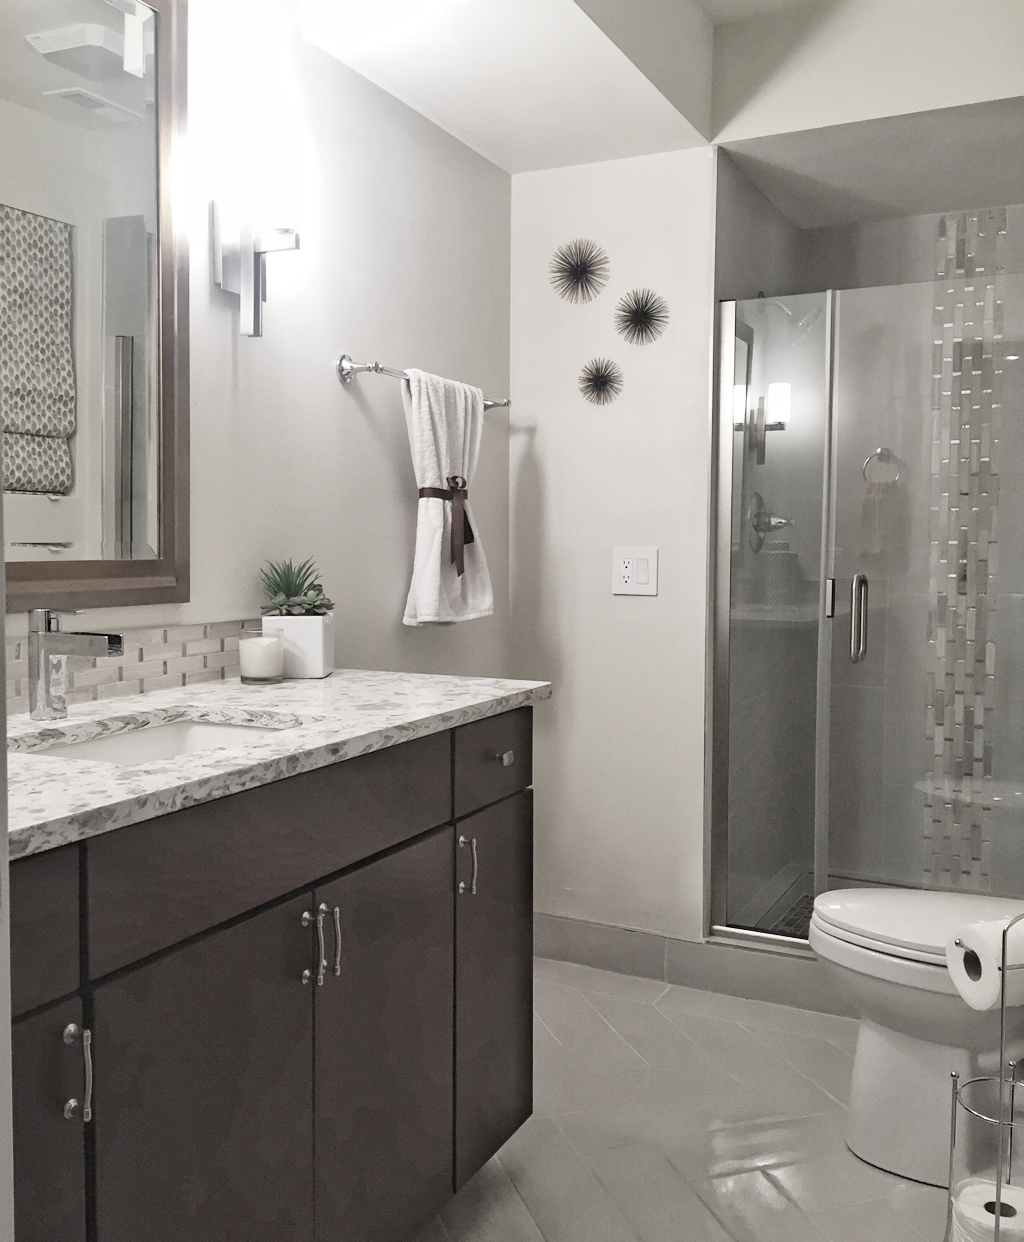 This is shorter than my previous home renovation entries but I hope you were able to get some inspiration from this blog just as much.
Our basement bathroom was completed about two years ago and we are looking to redo our laundry room next. A design concept has already been done - now we just need to secure the materials and get to work! Stay tuned for that entry! Where we got our items:
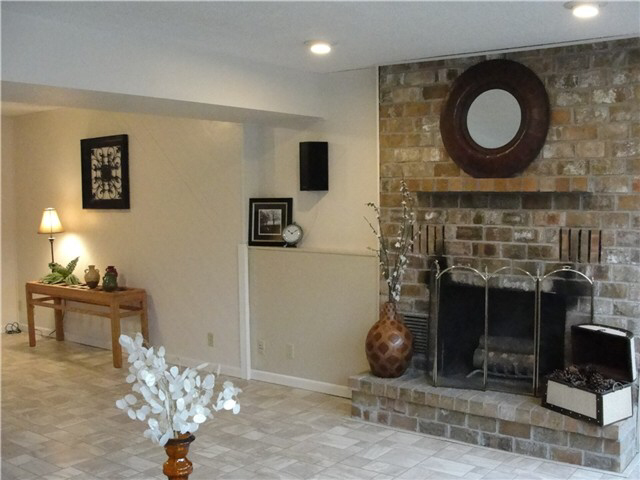
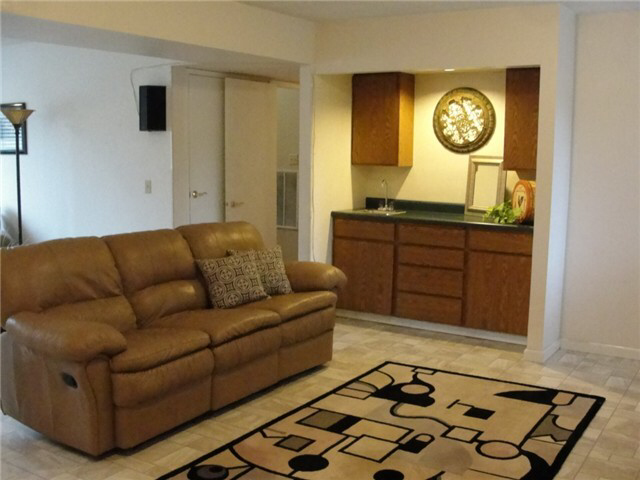
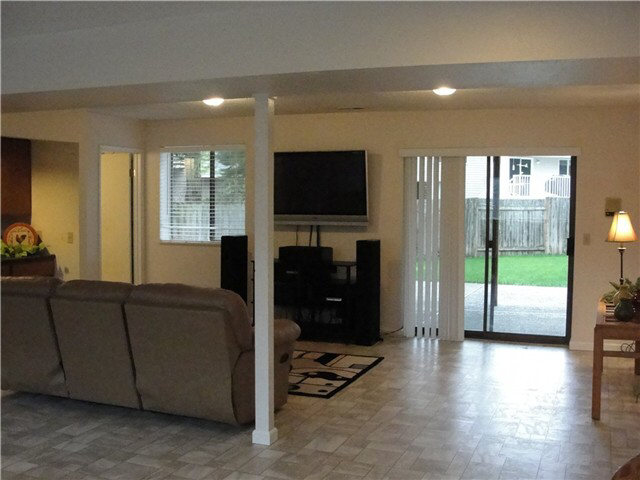
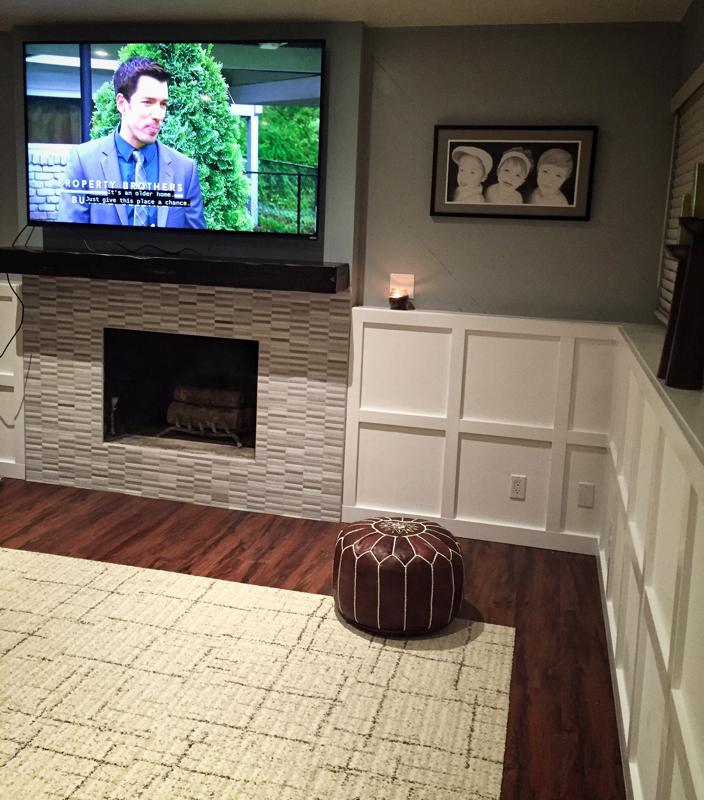
~ XOXO, Mari BASEMENT (Family Room • Office • Bar)Our basement was once occupied by my brother-in-law and, when he moved, we felt it was the right time to start renovations. I absolutely hated going downstairs and only really went when it came to doing our laundry. Spiders of all sizes occupied every nook and cranny. The place was filled with our unopened moving boxes and made it seem dark. The place always smelled dank and musty (even before we moved in). Surely this would’ve turned away a lot of homebuyers - as it did for Vuong - but I saw the potential. 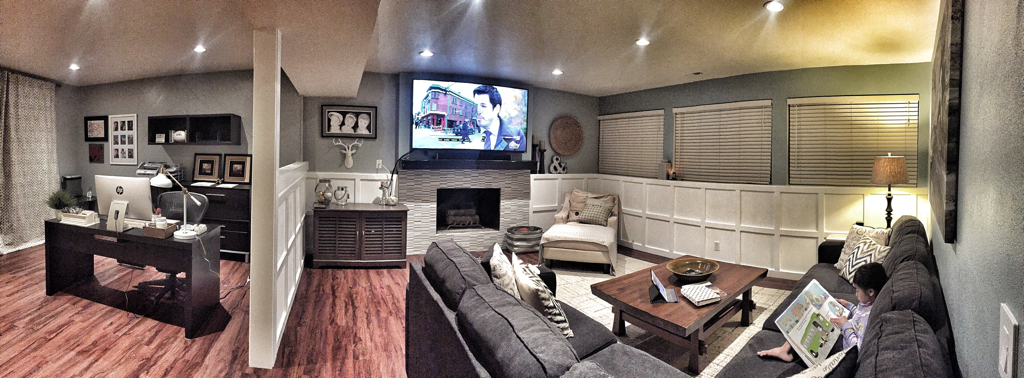 Vuong and I decided that our basement would need to be redone on a budget. We didn’t want too many costly materials in case of flooding. With hired contractors, however, we worked on some of it ourselves to keep costs down. BEFOREWhen we toured the house, whoever staged the basement did a decent job in making the space appear open, bright, and fresh (though I still thought it smelled a little like gym socks). Many areas of the basement had wallpaper - not the stylish kind we have nowadays but the dated kind that (we think) might have been applied in the early 80s. Design ConceptImmediately I went to work on the re-design. Vuong really didn’t know what he wanted but he envisioned a design similar to that of a 90's bachelor pad because it looked "clean, modern, and simple." Uh no...not if I could help it. I wanted simple as well but with some punch. The "punch" I envisioned came with architectural detail and some color. I played with color options and furniture layouts while working on my design...ultimately, we ended up going in a slightly different design direction but it still remained close to what we both wanted the space to be. The furniture in the space were just pieces I dropped from the design library and not actual store pieces we had our eye on. The office furniture from IKEA, however, was something we already had that I incorporated into the design. Also, the coffee table in the design was made to the measurements of our existing piece. The video below walks you through our finished space as if you were there. Pretty close to reality guys! When showing Vuong and our kids what our basement could look like, they were pretty wowed by it. :) DEMO & INSTALLATIONAs you'll see in the slideshow below, it truly was a team effort. Even my kids helped with the demo and installation:
If you read our previous blog entries on our upstairs, you may notice that the doors don't match what we installed in the basement (if you didn't know, now you know!). We installed 5-panel doors upstairs but the 3-panel ones were readily available. Since we needed them ASAP (and for a great price), we bought them. Painting them black helped them "blend" in with the doors upstairs. To this day NO ONE has noticed (or at least I don't think anyone has). Vinyl plank flooring was an inexpensive option. It worked best for both our economic needs and the basement sub floor. Also, we were told we could simply lay it over the existing vinyl and that it was an easy install. Though it isn't hand-scraped like the upstairs hardwood, we did a color match as close as we could so that, like the doors, the difference wouldn't be as obvious. VENDORS & SUPPLIERS
It took about 6 weeks or so to get everything cleaned up, demo'd, and installed. Now the fun part was about to begin - the DECORATING!!! Furniture & DecorWe used a lot of the same pieces from our last house. I wanted to replace everything with lighter-colored furniture but Vuong said "NO!" Other pieces we kept were framed artwork, our filing cabinet, coffee table, chaise lounge and bookcase. We wanted the furniture to have clean lines yet look comfortable. The only color I wanted was on the walls (pale blue and light bluish-gray wall colors) with neutral furniture pieces (creams, whites, and grays). All throughout our house, we chose blue as the main color to help us stay calm. New items we bought:
AFTERIn the slideshow below, I added some before and after photos so you can see the transformation. All the hard work was worth it. Although it wasn't exact to my original concept, the whole design works and, in our opinion, turned out for the better. There are still some areas we should have taken care of at the start but we'll tackle it at a later time. This project was definitely a labor of love for us all. For what it was, the hard work was worth it in the end because not only do we get to enjoy it but our family and friends do too.
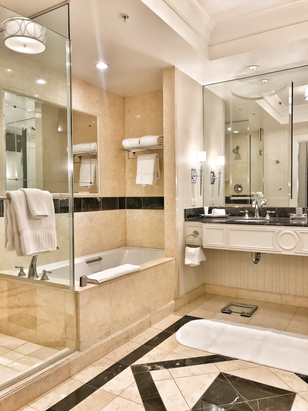
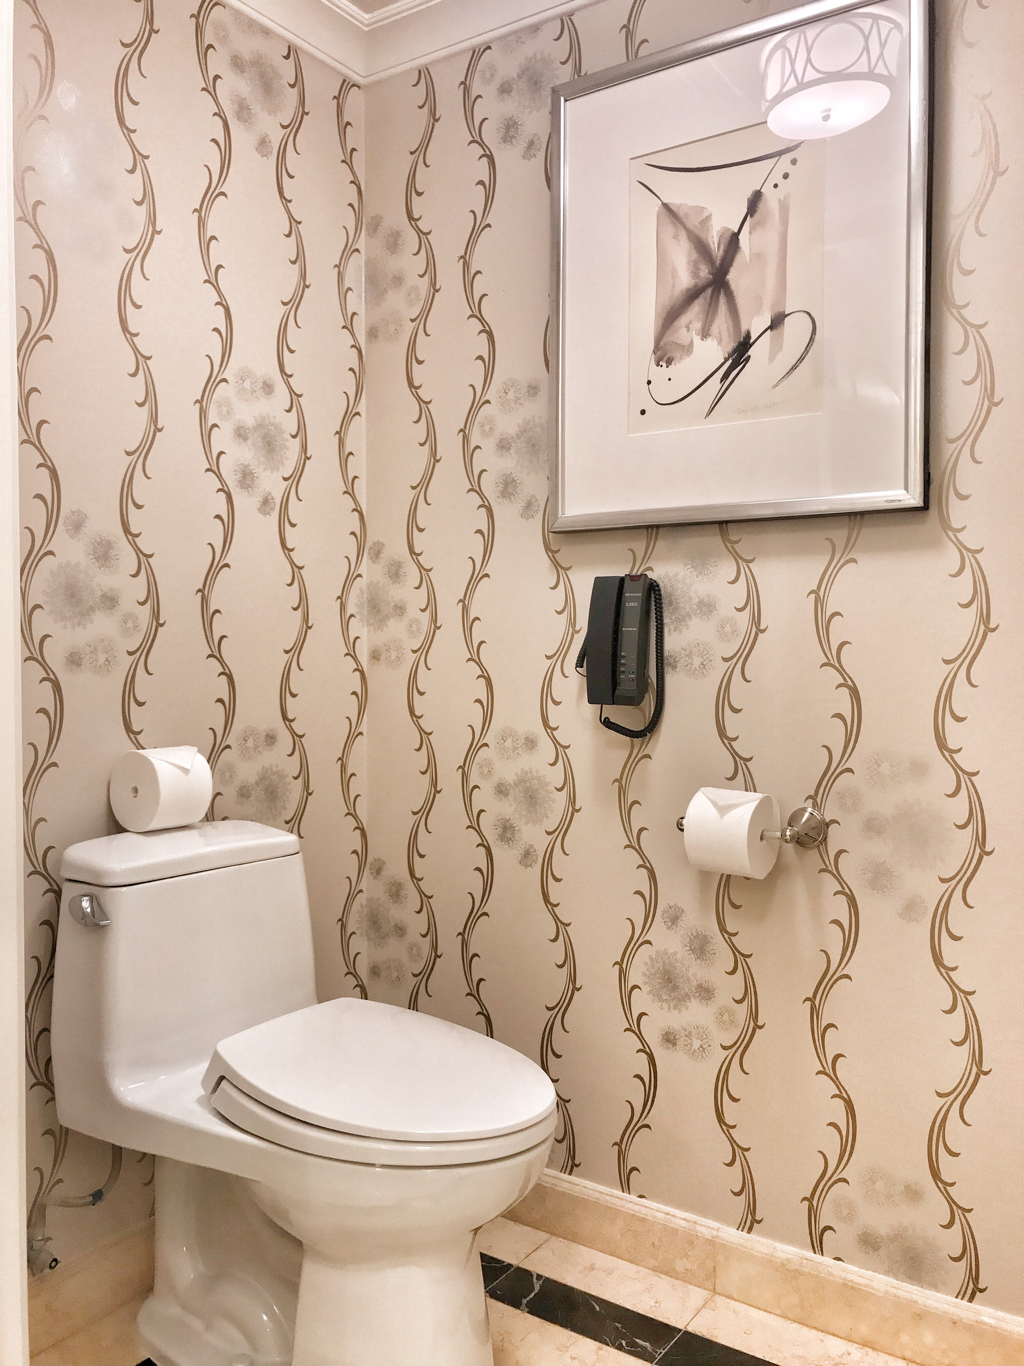
~ XOXO, Mari  Palazzo & Venetian at night INTERIORS MATTER to ME. A nicely decorated space really affects my mood and gets me going for the day. Before booking our plane tickets to Vegas, I made it a point to google the rooms (or suites) offered at Palazzo. Once we arrived, we were upgraded to a room at the Venetian but we ended up going back to the Palazzo because the interior reminded me of my mom's design style, which, is a lot more fancy than mine. The rooms in the Venetian and Palazzo are the same layouts but different styles - Venetian being more ornate and Italian or Renaissance-inspired with Palazzo being more updated, fresh and bright in style. So, Palazzo is definitely newer. We were placed in a double queen bed suite for the first night then stayed in a king bed suite for the duration of our stay. Although, the view from our room wasn't as beautiful as our upgraded room at the Venetian, it still wasn't bad. I think any view would do for me as long as we're not facing a wall.  View from our King-sized suite - NOT BAD! Upon entering our room, we loved how bright it was with spurts of chocolate brown and dusty blue throughout. The chocolate color helped to ground the space while the blue mid-toned color gave it a nice pop without being too in-your-face. As for the bed, I love crisp white sheets as it gives that clean and fresh feeling. Whenever I see hotel bedding that has a floral pattern, for example, it just seems dated. 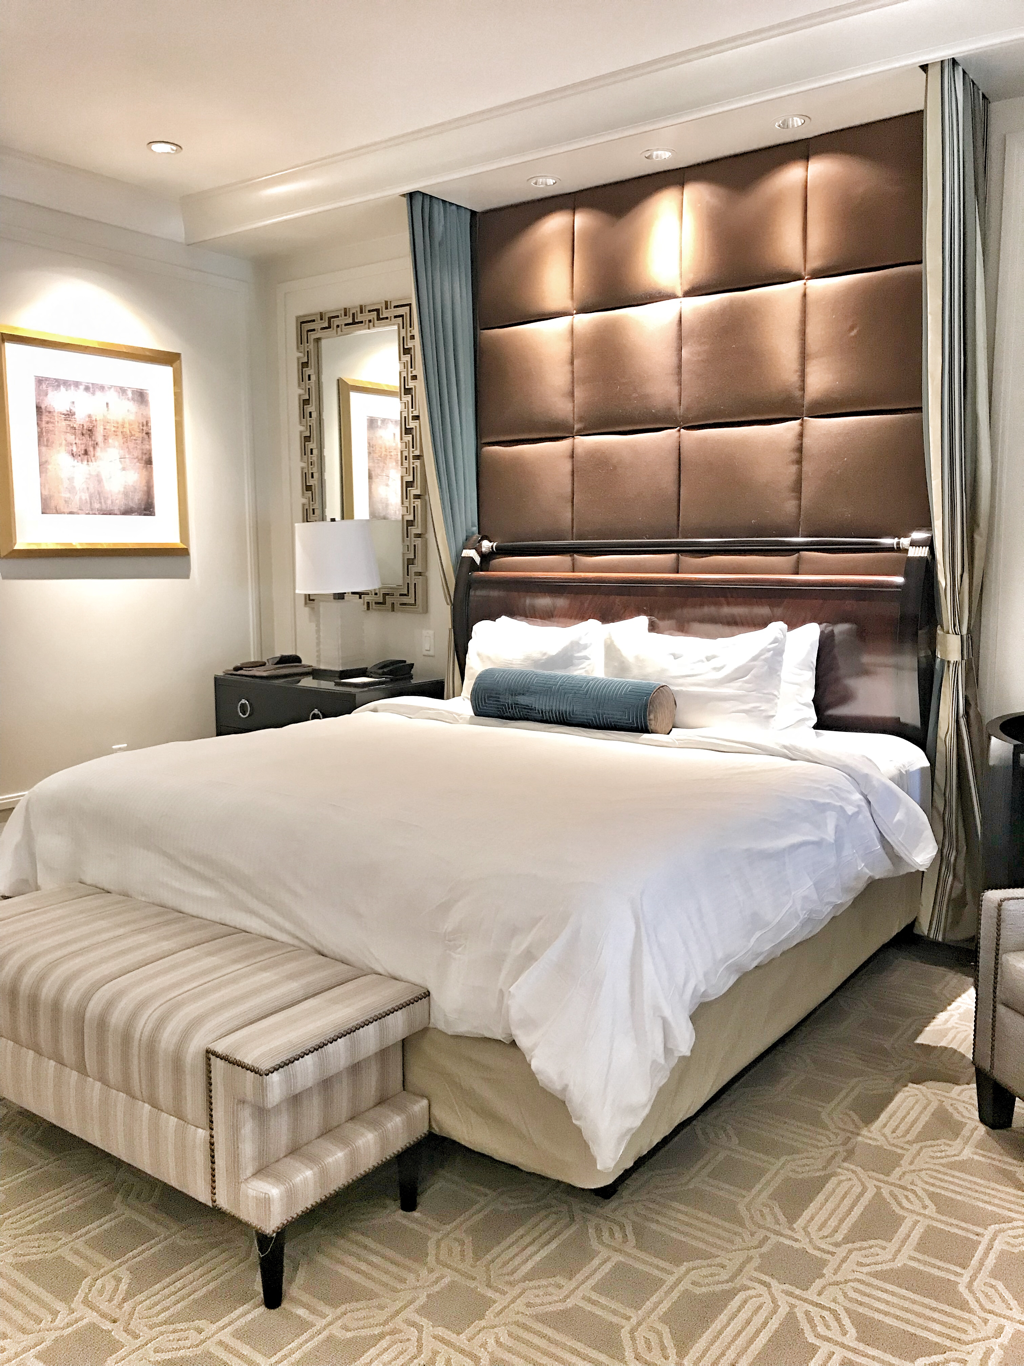 Beautifully framed King-sized bed Bathrooms between the Palazzo and Venetian are the same. - at least from what we saw. We liked that the toilet was in its own room, separate from the rest of the bathroom. :-) NOTE: if you're looking for the hair dryer, it's located in the drawer of the dark-colored table under the vanity mirror. It took us about 15 minutes to search for it.
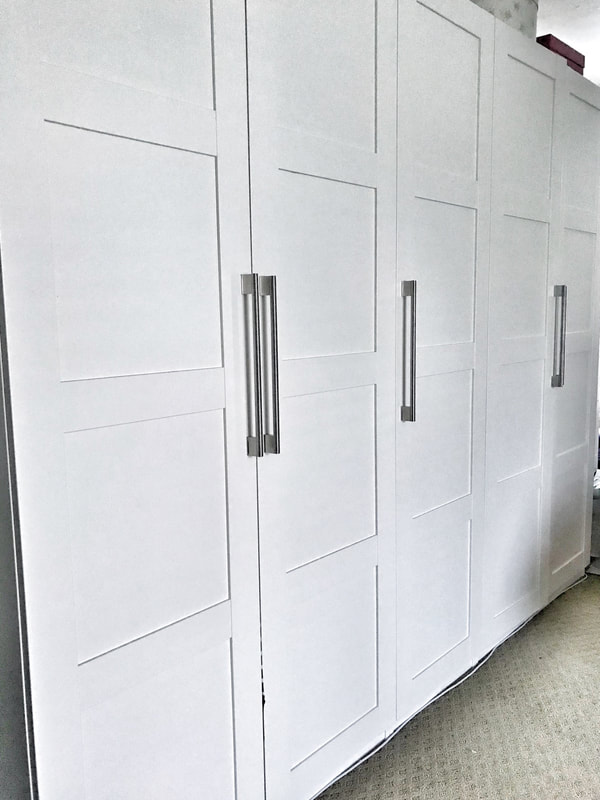
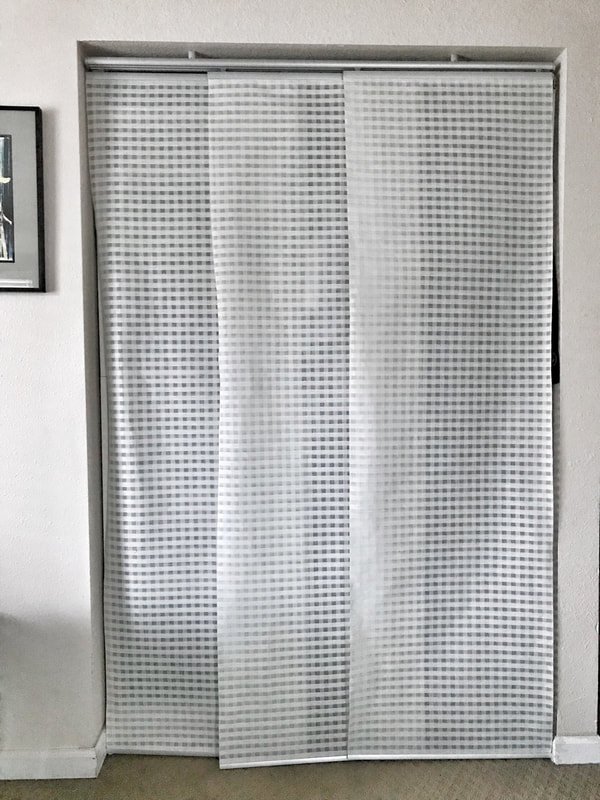
The suite is definitely big enough to accommodate a family. I think, if we were to stay again, I wouldn't mind having the kids tag along. My kids have definitely obtained my penchant for interior design and architectural details so I know they'd appreciate the room. We loved our suite. I wouldn't mind staying here again - maybe bring the kids the next time as they've never been to the strip (they have been to the airport, though, but that doesn't really count). :-) 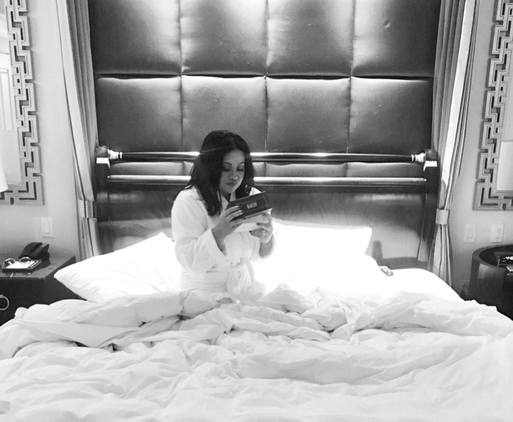 Now for the 2nd stage of our interior renovation. Since the main areas were now aesthetically pleasing - especially to our guests - it was time to update and refresh our personal spaces to match the public spaces in our home. Master Bedroom BEFORE: 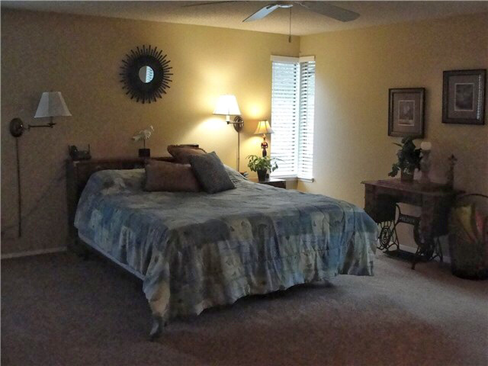 Master Bedroom AFTER Our bedroom was boring for lack of a better word. It was a weird layout and had small corner windows that I fixed with curtains to give it the illusion that they were bigger than they were. If we had the budget, I would've closed it off or installed a bigger window. There were a couple small closets - separated, might I add. We kept one but the other was completely knocked down to add more space to the tiny master bathroom. For the closet we kept, we removed the old doors and temporarily put IKEA panels in place of them. We will eventually replace with actual closet doors.  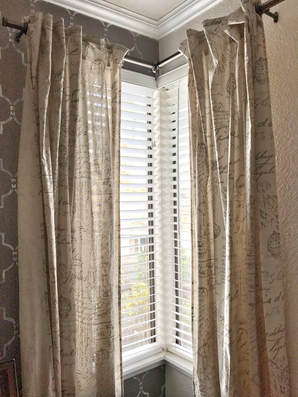
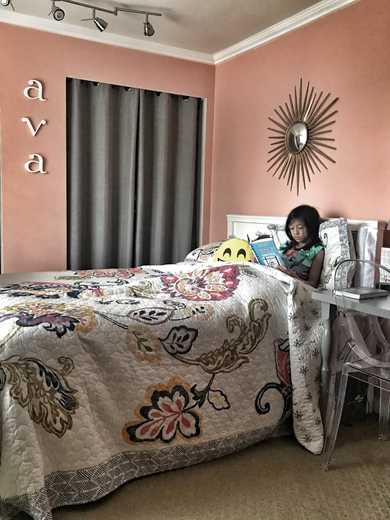
We re-did most of the room ourselves but had some help from my dad with the trim (base trim and crown moulding) - he was visiting from the Philippines and wanted to make himself useful. I did the wall stencil myself using the Marrakech Trellis Wall Stencil template from www.cuttingedgestencils.com Carpeting and light fixtures were replaced and we added a closet system from IKEA (for me) to add to the existing (small) closet, that my husband occupied. Wall lamps: Pottery Barn (no longer available but you can find similar pieces). Curtains: Pier 1 Imports. Bed frame is from the flash sale site, Joss & Main. Bedding is from West Elm. Euro pillow covers from IKEA. Bedside tables are from the warehouse wholesaler, Sanseco. Carpeting purchased from Great Floors in Kent, WA www.greatfloors.com/ KIDS’ Rooms The kids' rooms stayed the same layouts. We replaced the carpet, changed the wall paint, replaced the old lighting fixtures, removed the popcorn ceilings, added new trim, replaced the bedroom doors, and removed the closet doors (these will also be replaced eventually and are temporarily outfitted with IKEA sliding panels or curtains). We don't have BEFORE photos because each room is exactly the same layout. They all had beige, nylon frieze carpet and old, accordion-type closet doors. When it came to decor, we furnished their rooms with IKEA pieces and bought bedding and curtains from Overstock, Bed Bath Beyond, and Wayfair. We allowed the kids to decorate so that they could add a bit of their personality to their rooms - Christian added Xmas lights, Ava used toys as little tchotchkes, and Ashton put up his school artwork and video game posters throughout... Ava's Room This room is the biggest out of the 3 extra rooms and, naturally, this went to Ava because she had the most stuff - clothes, toys, books, art supplies, and accessories. We decided on light and girly but NO pink. Not only is it young and feminine but she could grow into the colors, as well. We settled with a peach color for her wall, which, she helped paint and gave it a garden-like vibe.
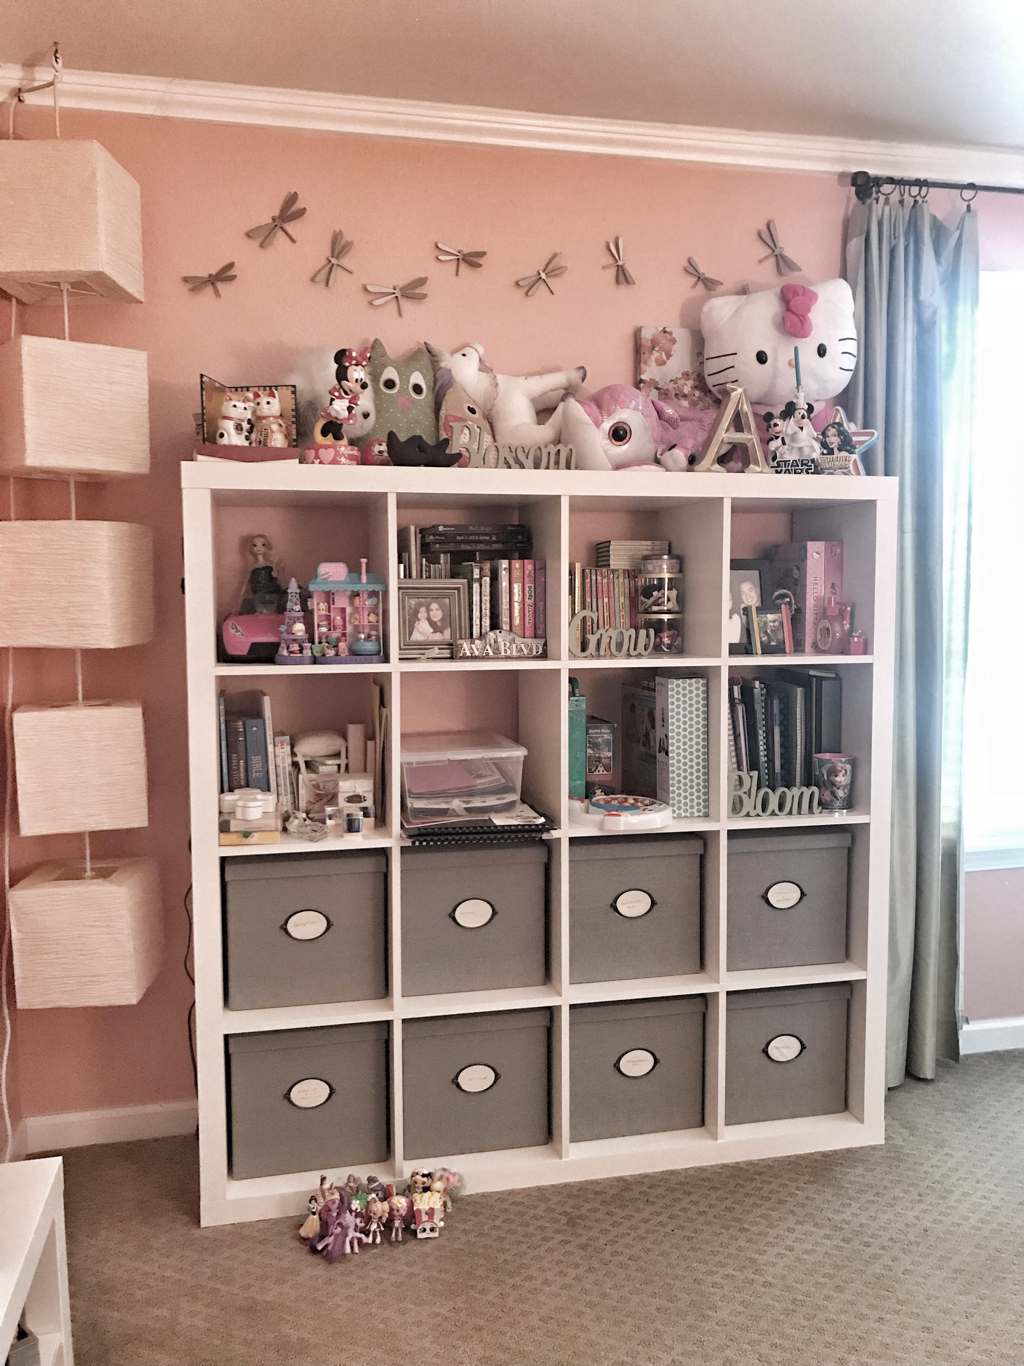
Ava's bed is actually a convertible crib and was meant to grow with her. The bookcase from IKEA is used to house her books, games, stuffed animals and artwork (I know, it looks cluttered, and I'm working on getting her to purge a bunch of her things). 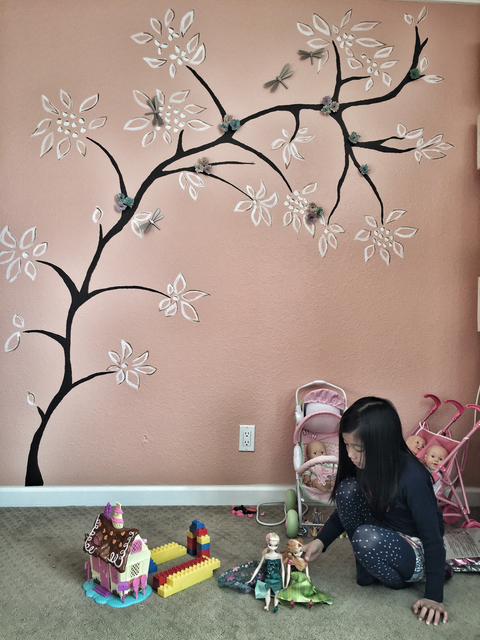 The tree mural in Ava's room was painted by yours truly. Initially, I was going to commission my friend to paint a mural because she's awesome at drawing but I wanted to give it a go to see if I could actually do it (plus money was tight). I took a photo of a tree I liked on Pinterest and free-handed it using sample paints from Home Depot. I also added the dragonflies (from Target) and 3D flowers (made them myself using a paper cutter from Joann Fabrics). I must give myself props...not too shabby! Christian's Room The smallest room went to our eldest son. Believe it or not, it's the room he chose. It's right off the master bedroom and, if it were possible, could be converted into a nice, walk-in closet...maybe when he goes off to college?! Well, it's definitely still open for debate. 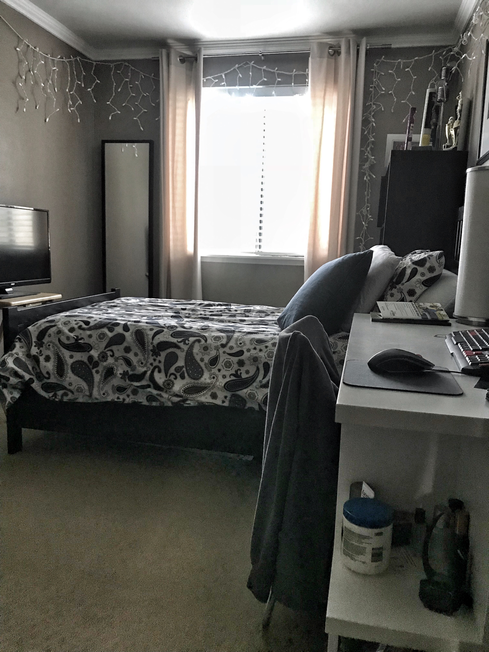 Ashton's Room His room was the only one left so he really had no choice. Luckily, he didn't mind too much (aside from one creepy thing about it) - he just didn't want to share a room with his older brother any more. Anyway, the other two kids didn't want that room because there's access to the attic through his closet and they were freaked out by it. After re-doing his room, Ashton ended up loving it and didn't think twice about the creepy attic. 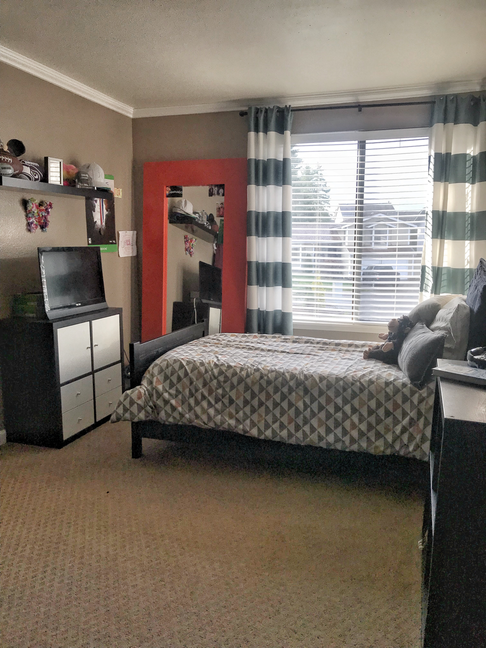 Master Bath BEFORE Contractor: Vu Construction It took me about 2 mos before I started taking a shower in our master bath. I was grossed out by its old fixtures and moldy-looking corners. The whole room was super tiny and I felt like I couldn't move around in it. Plus the green laminate counter-top, smelly cabinets, and poor lighting didn't make things any better. Now this may be TMI but I didn't really sit on the toilet seat (I just, kind of, hovered over it because I didn't want my skin to come into contact with it). It was chipping on the edges and appeared to be the original toilet to the house...  Demo of the original MASTER Bathroom We built right into the master bedroom, where, part of the old closet was to expand the master bath... 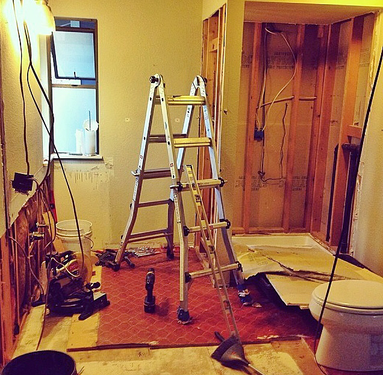 Master Bath AFTER 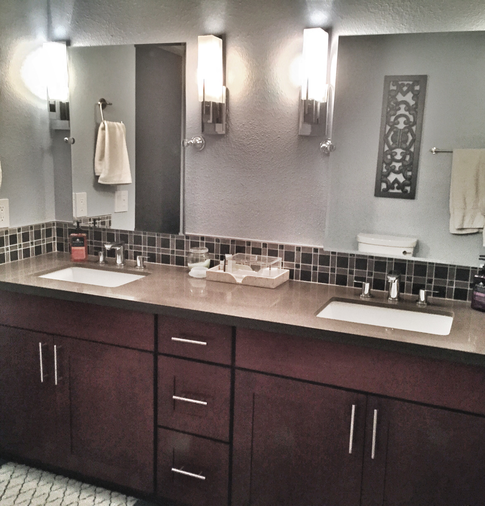 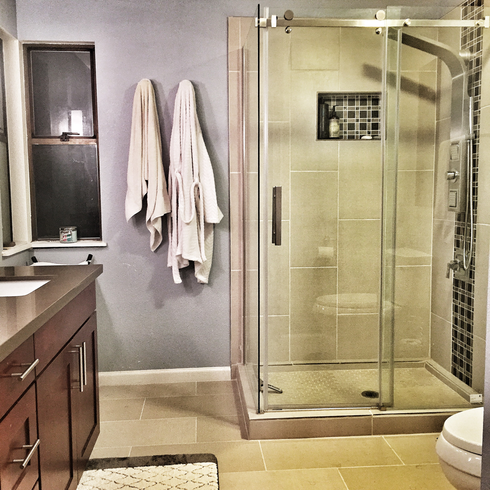 Now, there are some things I wanted to do...like remove the corner windows, move the shower to where the windows are and connect it to a tub but it just wasn't in our budget. So, we settled for just a shower since, realistically, we wouldn't have time for baths. The most important thing was we now had a decent amount of space! You know what they say, though...sometimes you can't have it all. Overall, we were pleased with the outcome of this 2nd phase. Now that we were (mostly) done with the upstairs, it was time to beautify our basement. I hope you enjoyed this entry and make sure to stay tuned to read about our next renovation phase! ~XOXO, Mari Counter-tops & cabinetry from Evergreen Granite in Kent, WA www.evergreengranite.com/ Master bath flooring, wall tile, and sink faucets from Home Depot, Accent tile from Lowes. Shower fixture and toilet from Costco Cabinet door handles and wall mirrors from Lowes. Glass shower doors from Amazon.com Lighting from Lamps Plus in Tukwila, WA www.lampsplus.com/ |

Meet MariWelcome to my blog where I share my inner thoughts on life and all things I love - beauty, home decor and design, amazing food, our family travels, and fashion! Archives
March 2021
|


 RSS Feed
|
|

|